
About the GCP integration
Plerion integrations connect your GCP projects to the platform so risks across your cloud footprint can be continuously assessed and reported.- Complete visibility The more GCP projects you integrate, the more accurate and complete your risk reporting becomes. Each integration feeds findings into Plerion’s dashboards, where you can filter and analyze results by project.
- Organization-wide and keyless Connect a whole GCP organization at once. Plerion authenticates using Workload Identity Federation, so no service account key is ever created or stored. Plerion discovers every project automatically, including ones created later, and you choose which ones it scans.
Organization-wide integration
Connect every project in a Google Cloud organization to Plerion in one step. Plerion discovers every project under the organization, including ones created after you connect it, and scans the ones you select.Prerequisites
- Organization Admin (or equivalent) access to the GCP organization you want to connect.
- Nothing to create for the Plerion service project. The onboarding script or the Terraform template sets it up automatically.
Both the Workload Identity pool and the service account Plerion authenticates as must live inside a GCP project, since GCP requires it. Rather than asking you to designate one of your workload projects, the onboarding script or Terraform template creates a small, dedicated project to hold them: no workloads run in it, and it adds no compute cost. Keeping it separate from the projects you actually run workloads in keeps the access boundary clean and easy to audit.The project is named Plerion service project, with a project ID beginning with
plerion-service- followed by a random suffix. GCP project IDs are unique across every Google Cloud customer, not just within your organization, so a fixed ID would only ever work once, for whoever claimed it first; the random suffix guarantees one is always available. Either path also labels the project plerion-service=true. The script looks for that label on every run and reuses the project it finds. Terraform keeps using the project in its state; to run it again from a fresh state, set service_project_id to the existing project.Steps to connect a GCP organization
1
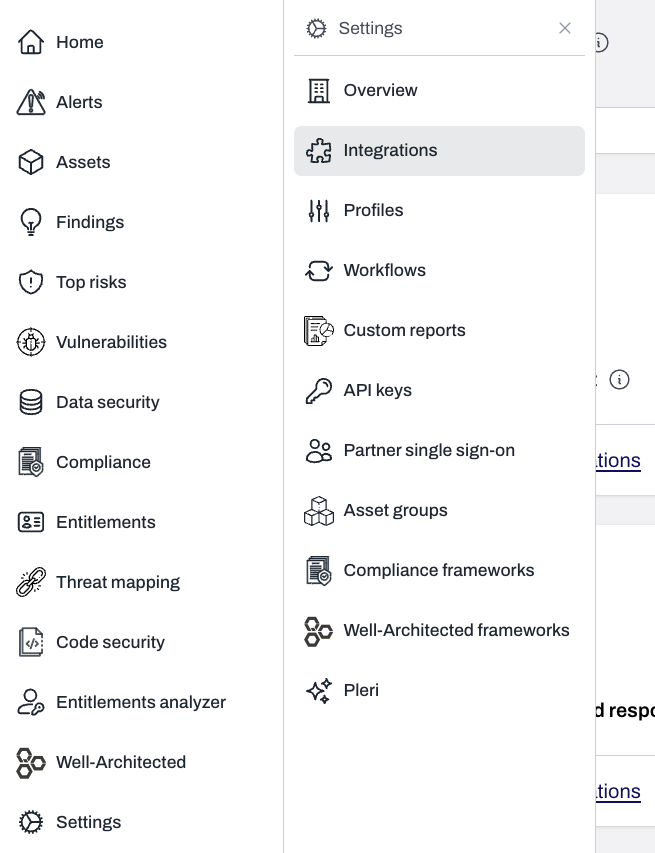
On the Plerion dashboard, go to Settings > Integrations
2
Find GCP and click the + button
Choose GCP organization. Plerion opens straight into capability selection: there’s no name, environment, or schedule form to fill in up front. Plerion names the integration after your GCP organization once it’s detected, and applies a default daily scan schedule; adjust the name, environment, or schedule later from the integration’s page.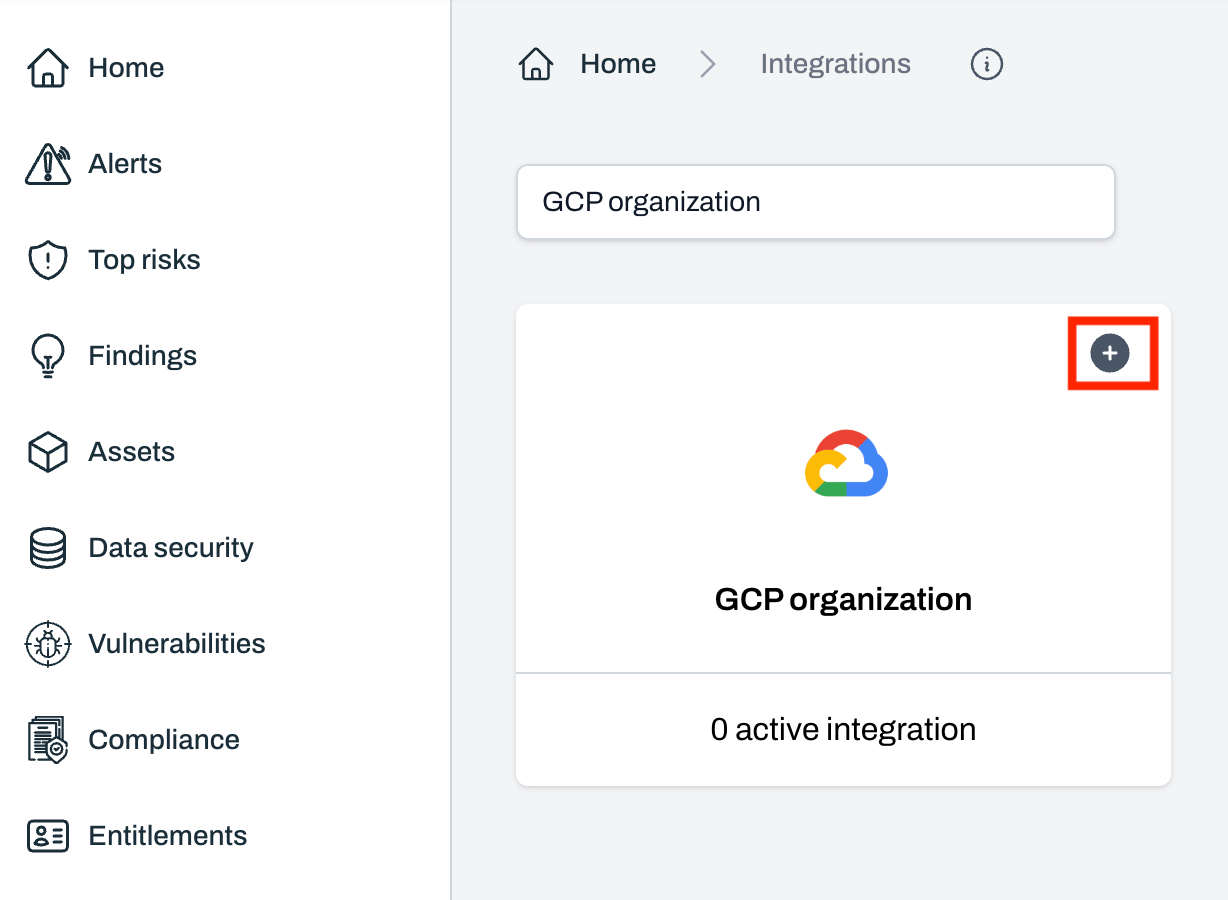
3
Select capabilities
- Cloud security posture management (CSPM) and Cloud infrastructure entitlement management (CIEM) are always on and can’t be turned off.
- Cloud workload protection platform (CWPP) is optional. Turning it on grants Plerion the access it needs for agentless workload scanning, and you can change or revoke this access at any time. Workload scanning itself (what it scans, how it works, and how to turn it on) is covered separately in Workload scanning.
- Click
Next. Capabilities are editable later from the integration’s detail page; expanding access may prompt you to re-run the script or Terraform apply so the GCP-side grants match, but it’s a quick sync, not a full re-onboard.
4
Grant Plerion access
Choose the Script or Terraform tab.Either path finds your organization automatically and creates or reuses the Plerion service project. You never name or provide a project yourself. Plerion detects the new organization once the script or
- Script
- Terraform
- Open Google Cloud Shell in the organization’s Google Cloud console.
- Paste and run the generated command. It downloads and runs
plerion-gcp-onboard.sh, which sets up keyless access and registers the organization with Plerion. Nothing is installed outside Cloud Shell. - The script prints every command it runs before running it, so you can review exactly what it does. It never creates or downloads a service account key.
terraform apply completes, and you can navigate away from this page while you wait.If registration fails on the first run: newly granted GCP IAM permissions can take a minute to propagate. The script already retries registration automatically (for up to about 3.5 minutes) before giving up, and every step it runs is safe to repeat, so re-running the same command resolves this. If the script instead reports that your access token expired (tokens are valid for about 2 hours), re-running the same command won’t help: open the wizard again and copy a fresh command.
5
Choose projects
Once Plerion detects the organization, it shows every project discovered so far, all selected by default.
- Search by project name, ID, or label to narrow a long list.
- Use
Select allorDeselect all. Either acts on the current search results when a filter is active, or on every project otherwise. - Turn
Automatically include new projectsoff if you don’t want projects created later to join automatically. New projects are discovered and scanned with no further action while it’s on. - Click
Add <N> projectsto confirm your selection. Deselecting every project swaps this toContinue without projects; the organization integration keeps scanning organization-level resources either way, and you can add projects later from the integration’s page.
If
Automatically include new projects is on, new projects can take up to an hour to appear as an integration in Plerion.6
Done
Plerion takes you to the organization integration’s detail page. From there you can see every discovered project, the organization’s own scan history and next scheduled scan, and the Plerion service project it created for you.
What the organization integration scans
Beyond discovering every project and scanning the ones you select, each scan of the organization integration itself collects:- Organization details and the organization-level IAM policy: who has access at the organization level, and what they can do.
- Folders: the hierarchy Plerion walks to discover projects.
- Organization policies: the organization policy constraints enforced across the organization.
- VPC Service Controls service perimeters: the access boundaries configured in Access Context Manager.
Scan now action all appear on the organization integration’s detail page, the same as any other integration, and its scan schedule can be changed at any time. That schedule also serves as the default for every project the integration discovers going forward. Changing it doesn’t retroactively update projects already discovered, but it applies to any new project found afterward.
What the script or Terraform creates
The onboarding script or Terraform template grants Plerion’s service account a Plerion Posture Read custom role, scoped to the configuration and metadata of the GCP services Plerion supports. Plerion defines and reviews every permission in this role. Plerion cannot modify or delete your resources, and reads only resource configuration and metadata, never the contents of your data. That excludes object contents, database rows, message payloads, log bodies, secret values, and model or AI content. CWPP (workload access) uses a separate, opt-in role, described below. The script and Terraform template list every permission granted. Review either one before you run it. You can review the same grants afterward in your GCP IAM console. New organizations receive this access set automatically when you connect them. If CWPP (workload access) is enabled, the script or Terraform template also creates a custom role, Plerion Workload Scan, scoped to the following permissions:
This role deliberately excludes any write or delete permission on your resources beyond
disks.createSnapshot, the same boundary AWS workload protection uses: Plerion can create the temporary resources it needs to scan, but never modifies or deletes anything already in your environment. Turning on workload scanning (below) narrows that boundary slightly. For Compute Engine VMs, it adds a delete permission scoped only to snapshots Plerion itself created. For Cloud Run and Cloud Functions, the additional permissions are read-only. See the note below for details.
Plerion is granted no access to your Cloud Key Management Service (KMS) keys. Workload scanning doesn’t need it: Google decrypts snapshots and images with your project’s own service agents, so Plerion never needs your key to scan.
Turning on workload scanning (below) extends this same role further. Compute Engine VM scanning adds a small set of snapshot-related permissions, plus a second, tightly conditioned role. The
downloadArtifacts permission in the table above is already part of the base role, unconditioned on which workload types you pick. What Cloud Run or Cloud Functions scanning adds is a second, dedicated role bound to a separate artifact-scanner identity, created only while either type is turned on. See Access and permissions for the full, current grant list.Keyless access
Plerion never creates, downloads, or stores a service account key for an organization-wide integration. Instead, the script or Terraform template sets up Workload Identity Federation: Plerion authenticates as its own AWS identity and exchanges it for a short-lived GCP access token, scoped to only the service account it creates.Excluding a project’s custom images
The onboarding script or Terraform template creates thePlerionAccess resource tag key with a Denied value. Tag a project PlerionAccess: Denied and Plerion loses read access to that project’s custom images automatically, with no further action needed. This only matters when the Compute Engine custom images workload type is on.
The tag doesn’t exclude the project’s instances or other workloads from scanning. To stop scanning a project altogether, exclude it under Manage projects. See CMEK-encrypted disks for why encryption keys play no part in this.
The tag is project-level. Tagging a project excludes every custom image in it.
Projects Plerion does not scan
Google creates and owns a small number of projects inside your organization to hold Workspace products. They contain no infrastructure you can manage or secure, so Plerion never onboards them. They are excluded during discovery, which means they don’t appear in the project picker and are scanned by neither posture nor workload scanning. Two rules identify them:- Any project under the
system-gsuitefolder at your organization root. This is where Google puts Apps Script and AppSheet container projects, and where it has added new folders in the past without notice, so the whole subtree is skipped. - Any project whose ID looks like
sys-followed by a long number. These are Apps Script containers, one per script in your Workspace.
gen-lang-client-...) sits at your organization root, is yours to manage, and is discovered and scanned normally.
Plerion does not exclude projects merely because their ID starts with
app-. That is a common prefix for real projects, so exclusion is based on the folder, not the name.Existing single-project integrations
Plerion no longer supports adding new standalone GCP project integrations. Connecting a GCP organization, above, is now the way to bring GCP projects under Plerion’s coverage. If you already have one or more single-project GCP integrations, nothing changes: they keep scanning and reporting findings exactly as before, and you can still view, edit, or delete them from the integrations page.To bring additional projects under coverage, or to move to organization-level capabilities such as automatic project discovery, connect a GCP organization instead.