> ## Documentation Index
> Fetch the complete documentation index at: https://docs.plerion.com/llms.txt
> Use this file to discover all available pages before exploring further.
# Webhook
> Integrate Plerion with custom webhooks to deliver alerts directly to your external web servers for flexible automation and workflows.
With the Webhook integration, you can automatically send Plerion alerts to an external web server. A request is triggered whenever an alert is created, updated, or resolved, allowing you to connect Plerion to custom workflows and automation.
**Note:** This is a one-way outbound integration. Alerts flow from Plerion to your webhook endpoint, but responses from your server will not update Plerion.
## Steps to integrate Webhook with Plerion
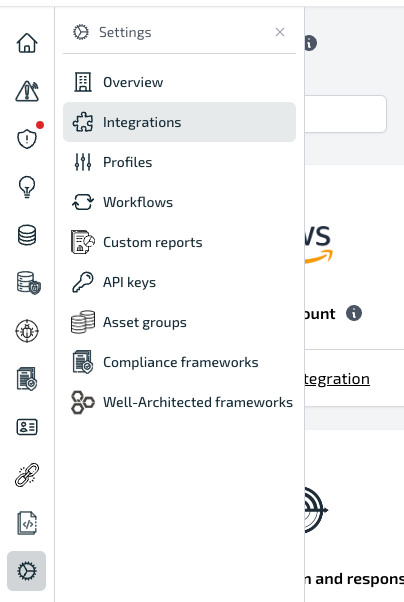
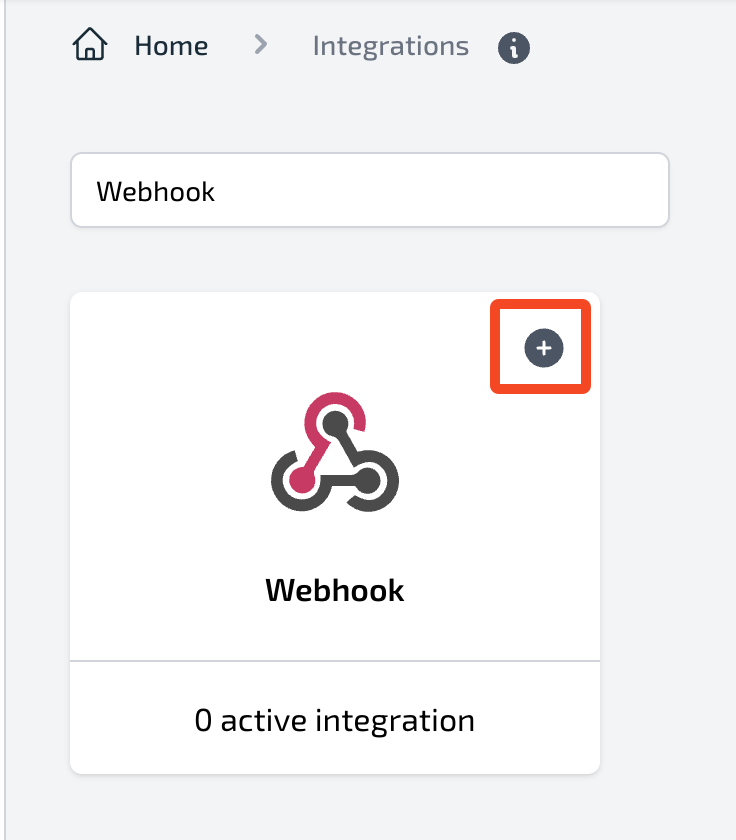 * **Integration name:** Enter a descriptive name.
* **Webhook URL:** Provide the endpoint that will receive alerts.
* **Secret (optional):** Configure a secret token for request signing.
* **Additional headers (optional):** Add any extra headers to send with the request.
After entering the details, click `Send test message` to confirm your server is receiving requests correctly.
* **Integration name:** Enter a descriptive name.
* **Webhook URL:** Provide the endpoint that will receive alerts.
* **Secret (optional):** Configure a secret token for request signing.
* **Additional headers (optional):** Add any extra headers to send with the request.
After entering the details, click `Send test message` to confirm your server is receiving requests correctly.
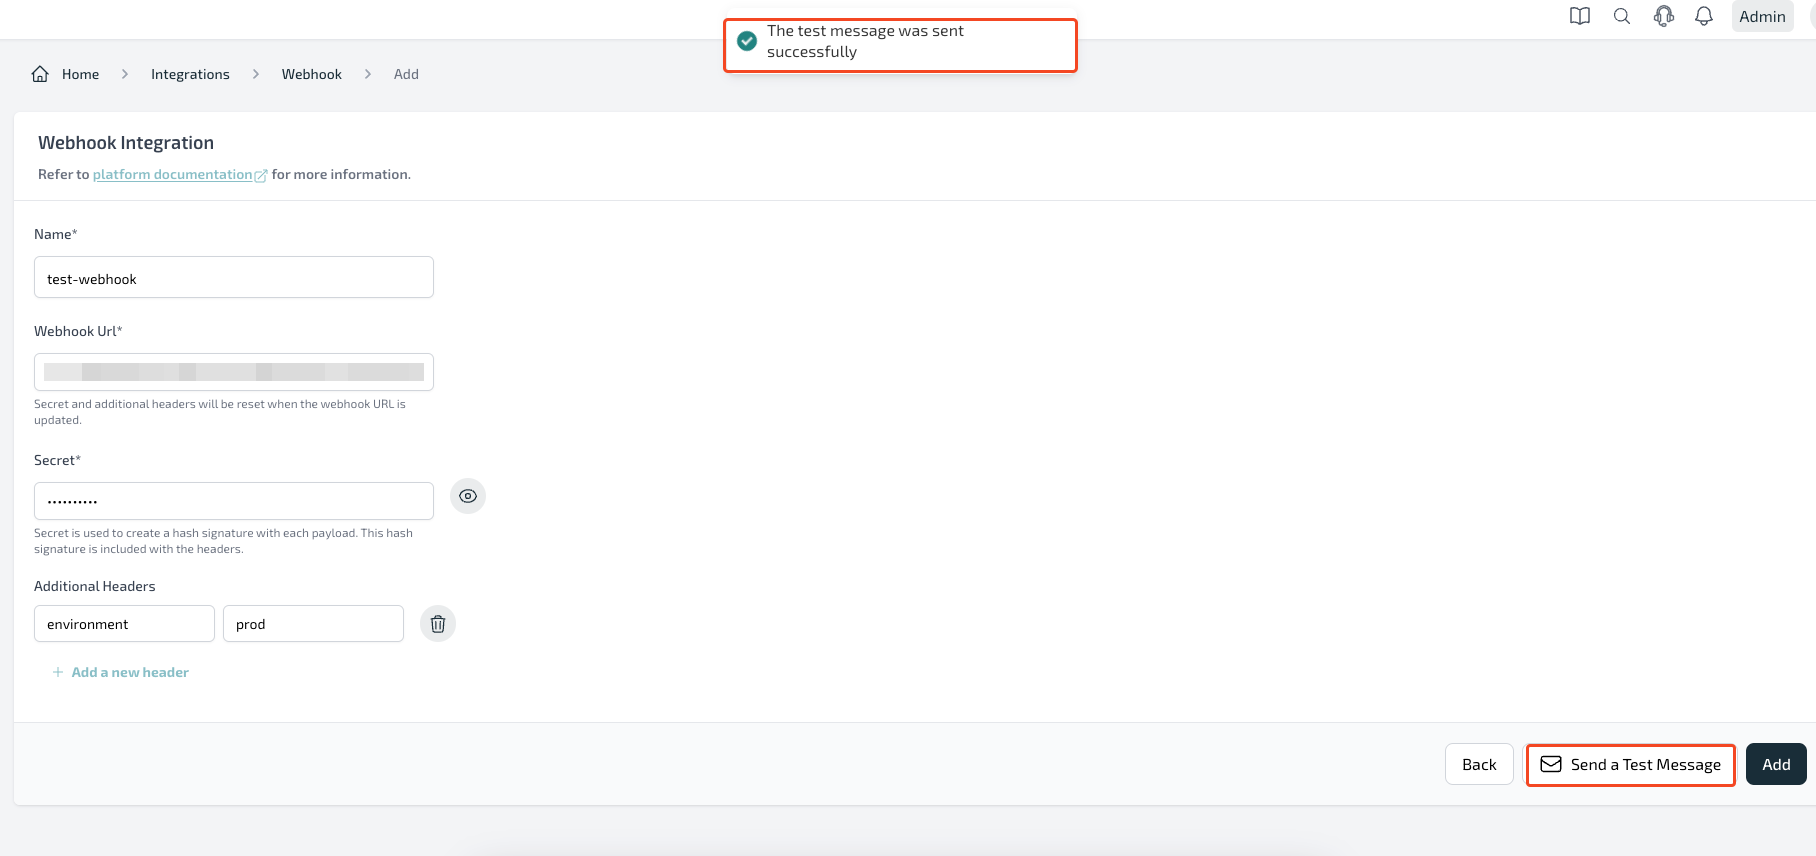 Click `Add` to complete the Webhook integration.
## Secret token and Signature
If you configure a **Secret**, Plerion will generate a hash signature for each payload and include it in the `plerion-signature` request header.
* The signature uses an HMAC SHA-256 hex digest.
* The header value is formatted as `sha256=`.
* The key is your secret token, and the payload body is the signed content.
This allows your server to verify that requests originate from Plerion.
### Validating payloads using secret token
To validate requests, compute the HMAC of the received payload using your stored secret and compare it to the `plerion-signature` header.\
We recommend setting the secret as an environment variable, not hardcoding it in your app.
```javascript TypeScript theme={"system"}
import * as crypto from "crypto";
const WEBHOOK_SECRET: string = process.env.WEBHOOK_SECRET;
const verify_signature = (req: Request) => {
const signature = crypto
.createHmac("sha256", WEBHOOK_SECRET)
.update(JSON.stringify(req.body))
.digest("hex");
return `sha256=${signature}` === req.headers.get("plerion-signature");
};
const handleWebhook = (req: Request, res: Response) => {
if (!verify_signature(req)) {
res.status(401).send("Unauthorized");
return;
}
// The rest of your logic here
};
```
```rb Ruby theme={"system"}
#Define a verify_signature function
def verify_signature(payload_body)
signature = 'sha256=' + OpenSSL::HMAC.hexdigest(OpenSSL::Digest.new('sha256'), ENV['SECRET_TOKEN'], payload_body)
return halt 500, "Signatures didn't match!" unless Rack::Utils.secure_compare(signature, request.env['HTTP_PLERION_SIGNATURE'])
end
#Then you can call it when you receive a webhook payload
post '/payload' do
request.body.rewind
payload_body = request.body.read
verify_signature(payload_body)
push = JSON.parse(payload_body)
"I got some JSON: #{push.inspect}"
end
```
### Payload Format
When an alert is created, updated, or resolved, Plerion sends an HTTP POST request to your webhook with the following structure:
```json JSON theme={"system"}
{
"data": {
"tenant": "",
"integration": "",
"integrationUrl": "",
"workflow": "",
"workflowUrl": "",
"alerts": [
{
"id": "",
"title": "",
"description": {
"resource": "",
"alertUrl": "",
"resourceType": "",
"alertSummary": "",
"status": "OPEN or RESOLVED"
},
"operation": "CREATED, UPDATED or RESOLVED"
}
]
}
}
```
* `tenant`: Name of the Tenant
* `integration`: Name of the Integration
* `integrationUrl`: URL for the Integration.
* `workflow`: Name of the Workflow
* `workflowUrl`: URL for the Workflow.
* `alerts`: Array of the alerts that were created/updated/resolved. Properties inside `alerts` array are described below:
* `id`: Contains the unique identifier of the Alert
* `title`: Contains the title of the Alert
* `resource`: Contains name of the resource or N/A if no asset is linked to the alert. \[Unavailable if status/operation is `RESOLVED`]
* `alertUrl`: URL to the alert on Plerion
* `resourceType`: Contains type of the resource for `OPEN` status. \[Unavailable if status/operation is `RESOLVED`]
* `alertSummary`: An array containing summary of the generated Alert. \[Unavailable if status/operation is `RESOLVED`]
* `status`: Status of the alert. Can be `OPEN` or `RESOLVED`
* `operation`: Signifies the operation of the alert. Can be `CREATED` or `UPDATED` or `RESOLVED`.
When you click on **Send a Test Message**, Plerion sends a request with this structure:
```json JSON theme={"system"}
"data": {
"title": "Plerion Test Message",
"message": "Tested by: ",
"integration": "",
}
```
Click `Add` to complete the Webhook integration.
## Secret token and Signature
If you configure a **Secret**, Plerion will generate a hash signature for each payload and include it in the `plerion-signature` request header.
* The signature uses an HMAC SHA-256 hex digest.
* The header value is formatted as `sha256=`.
* The key is your secret token, and the payload body is the signed content.
This allows your server to verify that requests originate from Plerion.
### Validating payloads using secret token
To validate requests, compute the HMAC of the received payload using your stored secret and compare it to the `plerion-signature` header.\
We recommend setting the secret as an environment variable, not hardcoding it in your app.
```javascript TypeScript theme={"system"}
import * as crypto from "crypto";
const WEBHOOK_SECRET: string = process.env.WEBHOOK_SECRET;
const verify_signature = (req: Request) => {
const signature = crypto
.createHmac("sha256", WEBHOOK_SECRET)
.update(JSON.stringify(req.body))
.digest("hex");
return `sha256=${signature}` === req.headers.get("plerion-signature");
};
const handleWebhook = (req: Request, res: Response) => {
if (!verify_signature(req)) {
res.status(401).send("Unauthorized");
return;
}
// The rest of your logic here
};
```
```rb Ruby theme={"system"}
#Define a verify_signature function
def verify_signature(payload_body)
signature = 'sha256=' + OpenSSL::HMAC.hexdigest(OpenSSL::Digest.new('sha256'), ENV['SECRET_TOKEN'], payload_body)
return halt 500, "Signatures didn't match!" unless Rack::Utils.secure_compare(signature, request.env['HTTP_PLERION_SIGNATURE'])
end
#Then you can call it when you receive a webhook payload
post '/payload' do
request.body.rewind
payload_body = request.body.read
verify_signature(payload_body)
push = JSON.parse(payload_body)
"I got some JSON: #{push.inspect}"
end
```
### Payload Format
When an alert is created, updated, or resolved, Plerion sends an HTTP POST request to your webhook with the following structure:
```json JSON theme={"system"}
{
"data": {
"tenant": "",
"integration": "",
"integrationUrl": "",
"workflow": "",
"workflowUrl": "",
"alerts": [
{
"id": "",
"title": "",
"description": {
"resource": "",
"alertUrl": "",
"resourceType": "",
"alertSummary": "",
"status": "OPEN or RESOLVED"
},
"operation": "CREATED, UPDATED or RESOLVED"
}
]
}
}
```
* `tenant`: Name of the Tenant
* `integration`: Name of the Integration
* `integrationUrl`: URL for the Integration.
* `workflow`: Name of the Workflow
* `workflowUrl`: URL for the Workflow.
* `alerts`: Array of the alerts that were created/updated/resolved. Properties inside `alerts` array are described below:
* `id`: Contains the unique identifier of the Alert
* `title`: Contains the title of the Alert
* `resource`: Contains name of the resource or N/A if no asset is linked to the alert. \[Unavailable if status/operation is `RESOLVED`]
* `alertUrl`: URL to the alert on Plerion
* `resourceType`: Contains type of the resource for `OPEN` status. \[Unavailable if status/operation is `RESOLVED`]
* `alertSummary`: An array containing summary of the generated Alert. \[Unavailable if status/operation is `RESOLVED`]
* `status`: Status of the alert. Can be `OPEN` or `RESOLVED`
* `operation`: Signifies the operation of the alert. Can be `CREATED` or `UPDATED` or `RESOLVED`.
When you click on **Send a Test Message**, Plerion sends a request with this structure:
```json JSON theme={"system"}
"data": {
"title": "Plerion Test Message",
"message": "Tested by: ",
"integration": "",
}
```