> ## Documentation Index
> Fetch the complete documentation index at: https://docs.plerion.com/llms.txt
> Use this file to discover all available pages before exploring further.
# Updating an AWS account
> Update an onboarded AWS account to apply new permissions, enable CWPP, or refresh integration resources.
Updating an AWS account keeps Plerion’s permissions up to date, ensuring the platform can continue scanning your cloud environments and reporting accurate findings.
You should update an account if:
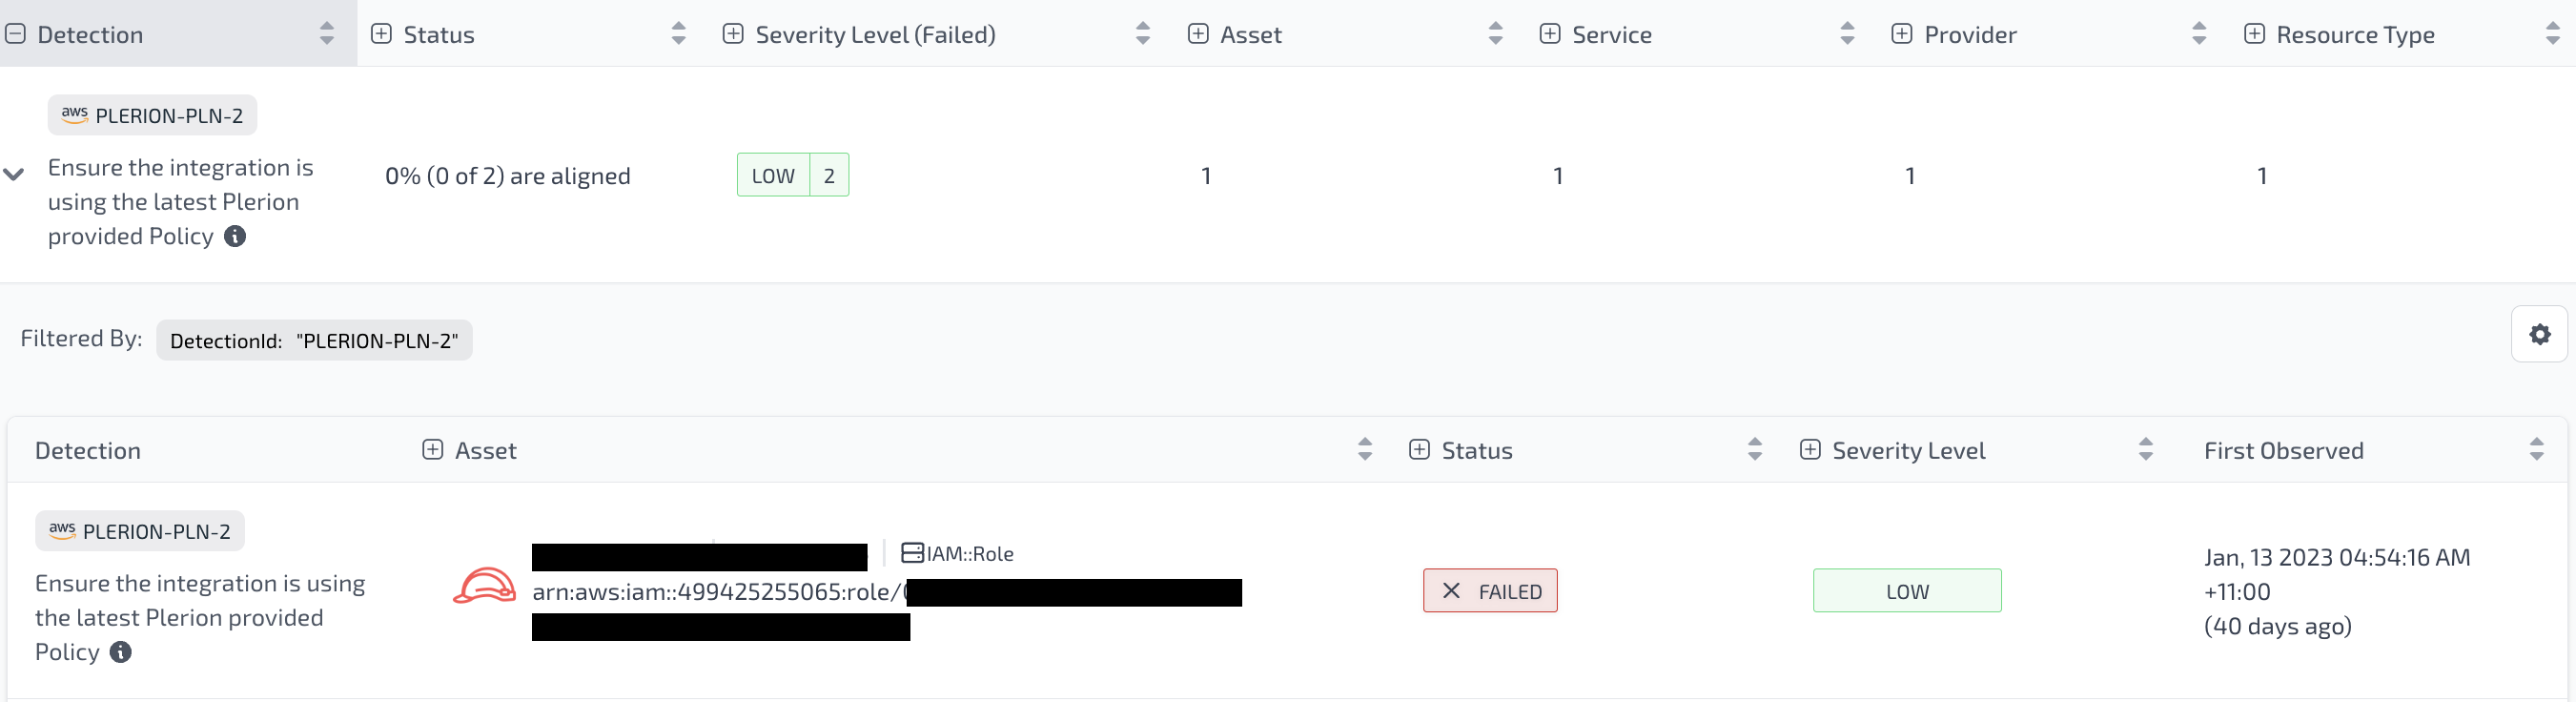
* **Template update required**: The Plerion CloudFormation template has been updated with new permissions. This is flagged by the **PLERION-PLN-02** detection. If this finding fails, update the account.
 * **Enable or disable CWPP**: Add or remove the Cloud Workload Protection Platform (CWPP) capability for an existing account.
***
## Steps to update a single AWS account
### Automated mode (recommended)
If you onboarded your AWS account using the **Automated mode**, you can update the CloudFormation stack in one of three ways:
* **Update existing stack using the AWS Console**
* **Update existing stack using the CLI**
* **Create a new stack**
#### Update existing stack using the AWS Console
* On the Plerion dashboard, go to `Settings` > `Integrations`, and find the AWS account you want to update
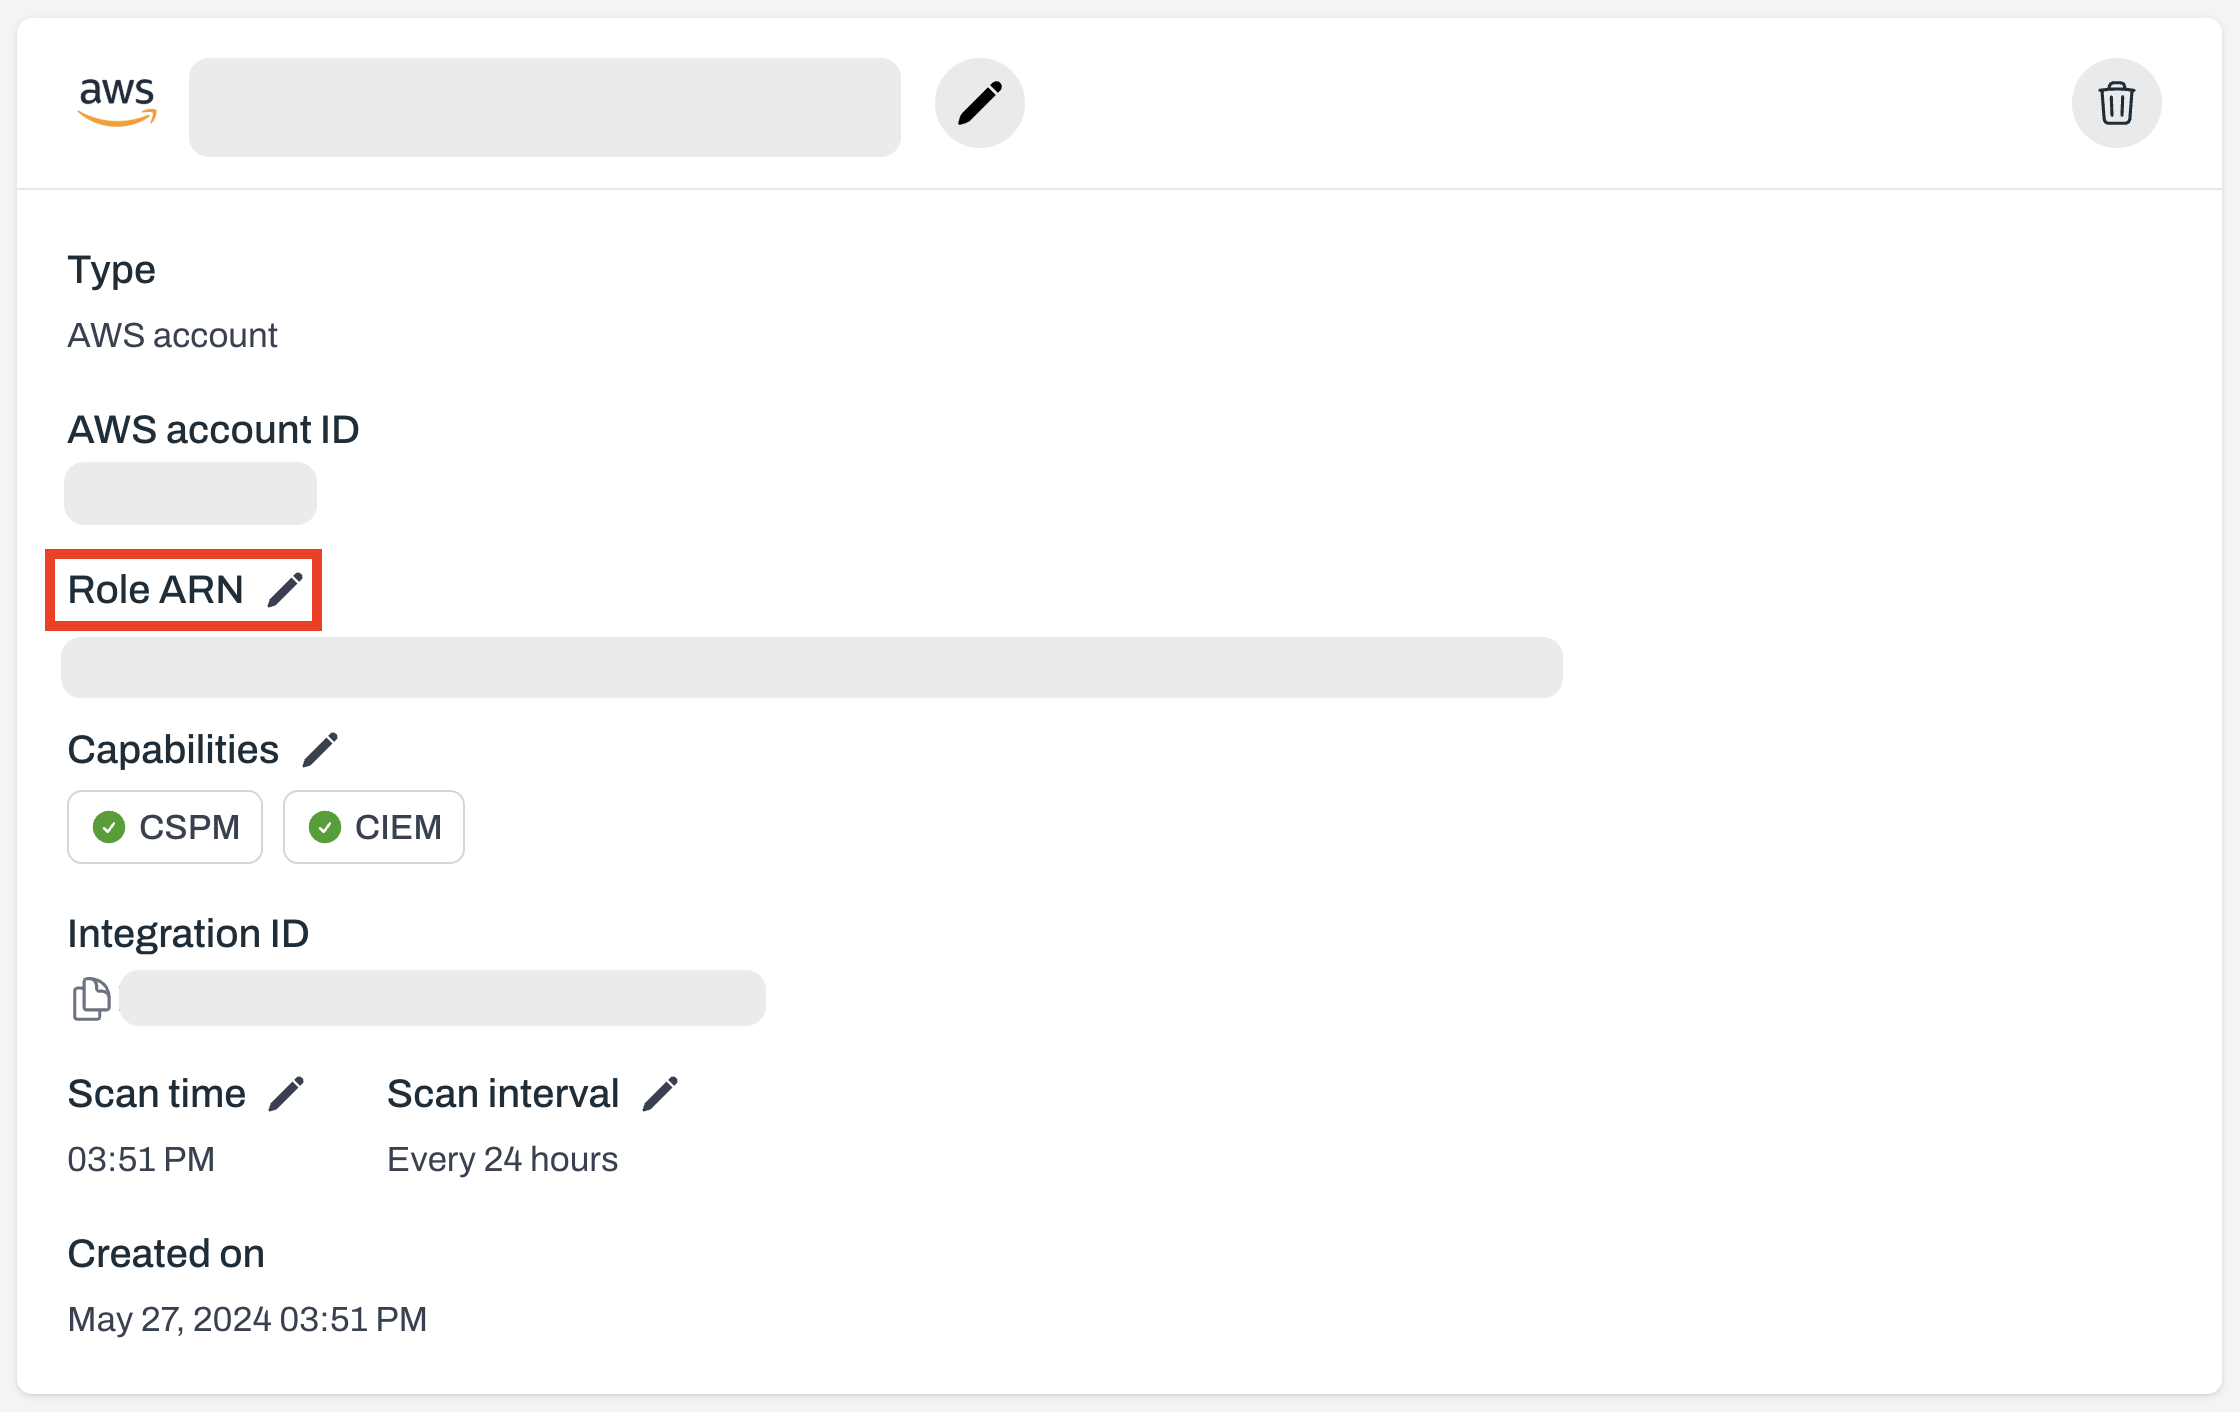
* Click the edit icon next to **Role ARN**
* **Enable or disable CWPP**: Add or remove the Cloud Workload Protection Platform (CWPP) capability for an existing account.
***
## Steps to update a single AWS account
### Automated mode (recommended)
If you onboarded your AWS account using the **Automated mode**, you can update the CloudFormation stack in one of three ways:
* **Update existing stack using the AWS Console**
* **Update existing stack using the CLI**
* **Create a new stack**
#### Update existing stack using the AWS Console
* On the Plerion dashboard, go to `Settings` > `Integrations`, and find the AWS account you want to update
* Click the edit icon next to **Role ARN**
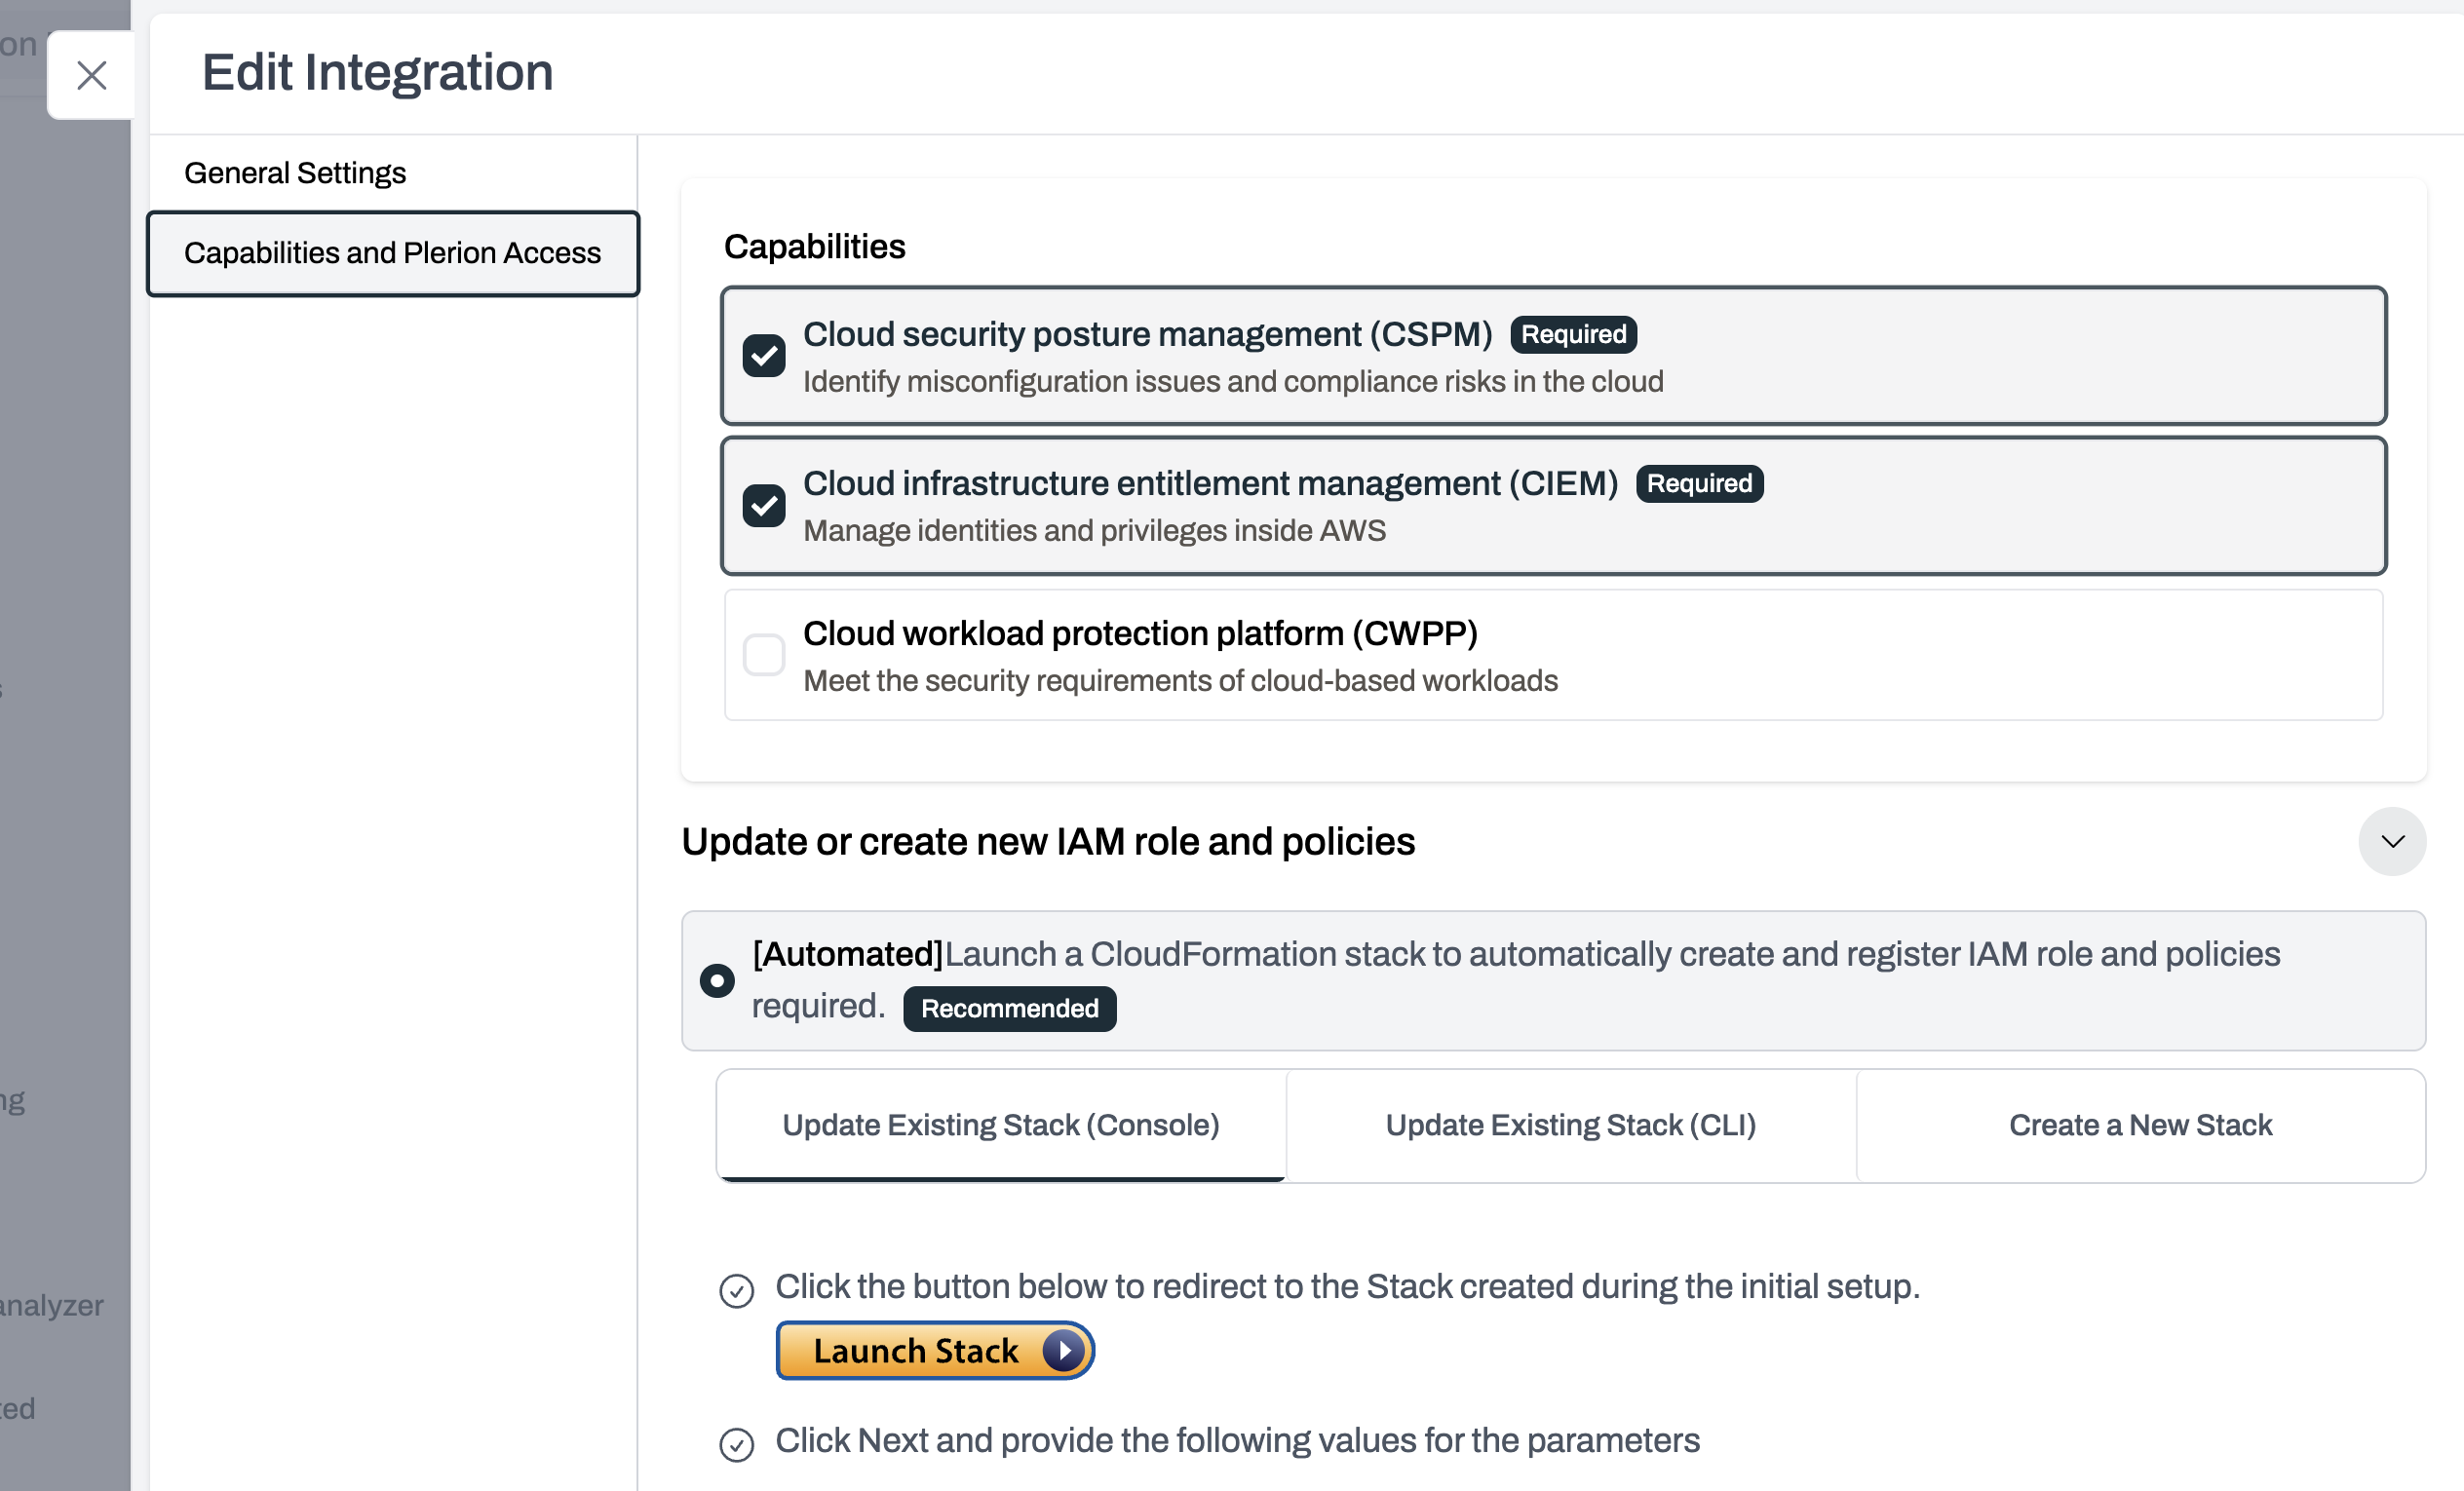 Copy the `AuthToken` value from Plerion’s **Stack Parameters** box into the matching field in AWS.
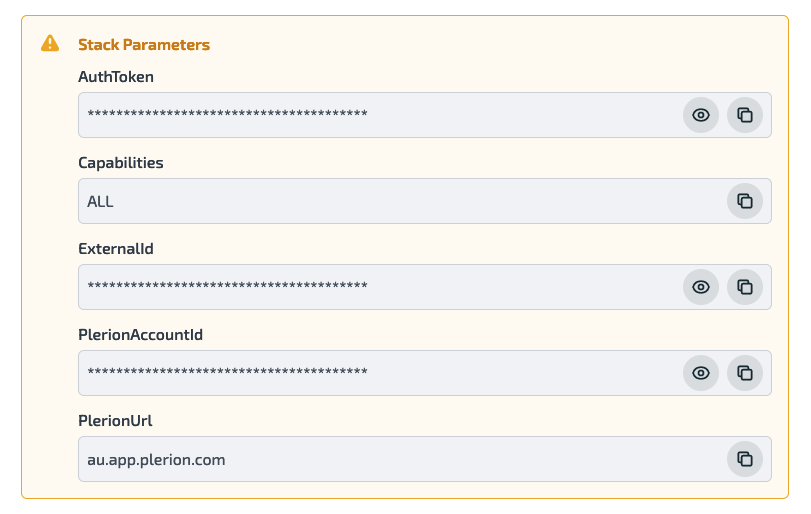
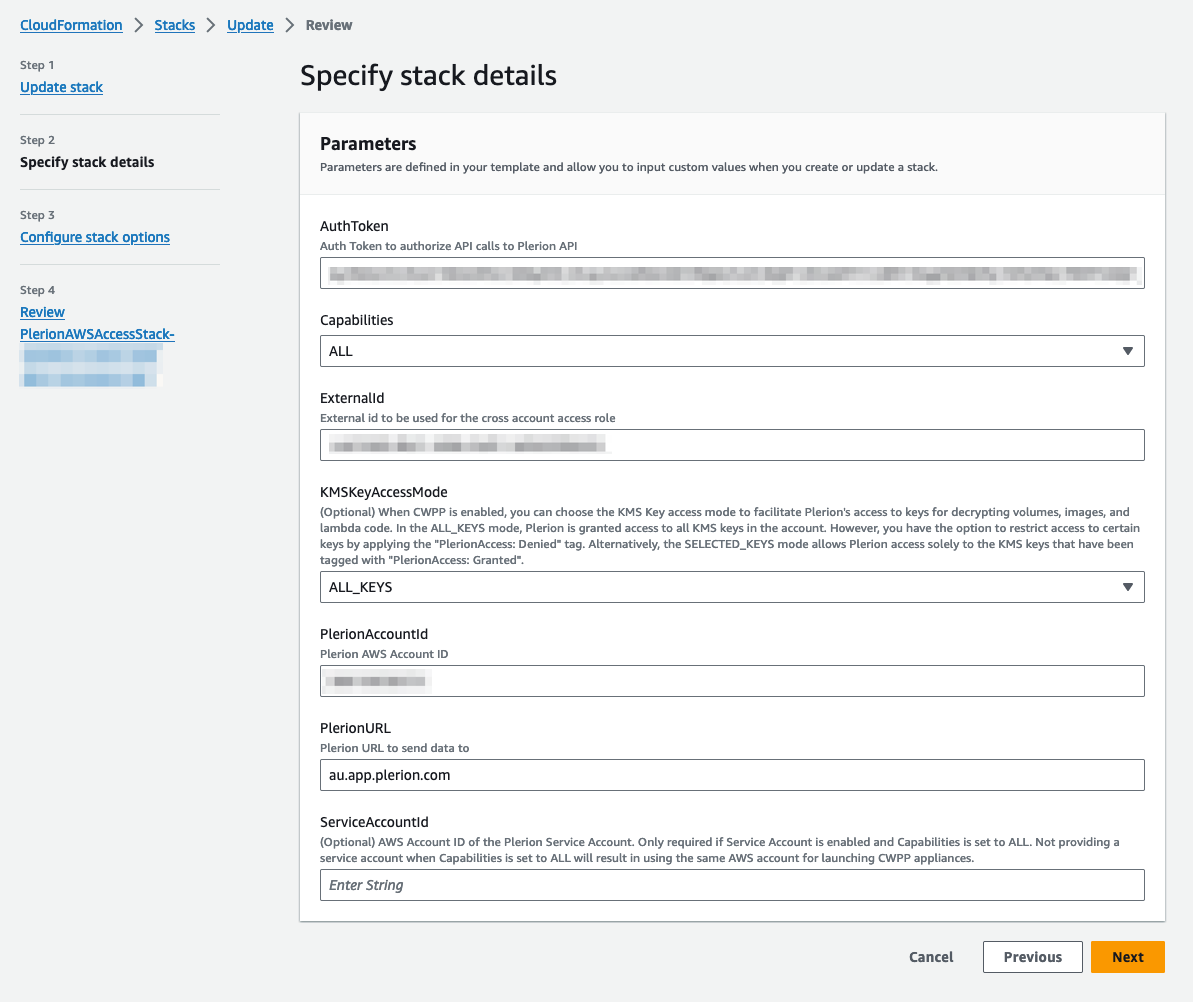 To enable workload protection, select **CWPP** before continuing.
Select **CWPP** if you want to scan workloads such as EC2, Lambda, or ECS.
To enable workload protection, select **CWPP** before continuing.
Select **CWPP** if you want to scan workloads such as EC2, Lambda, or ECS.
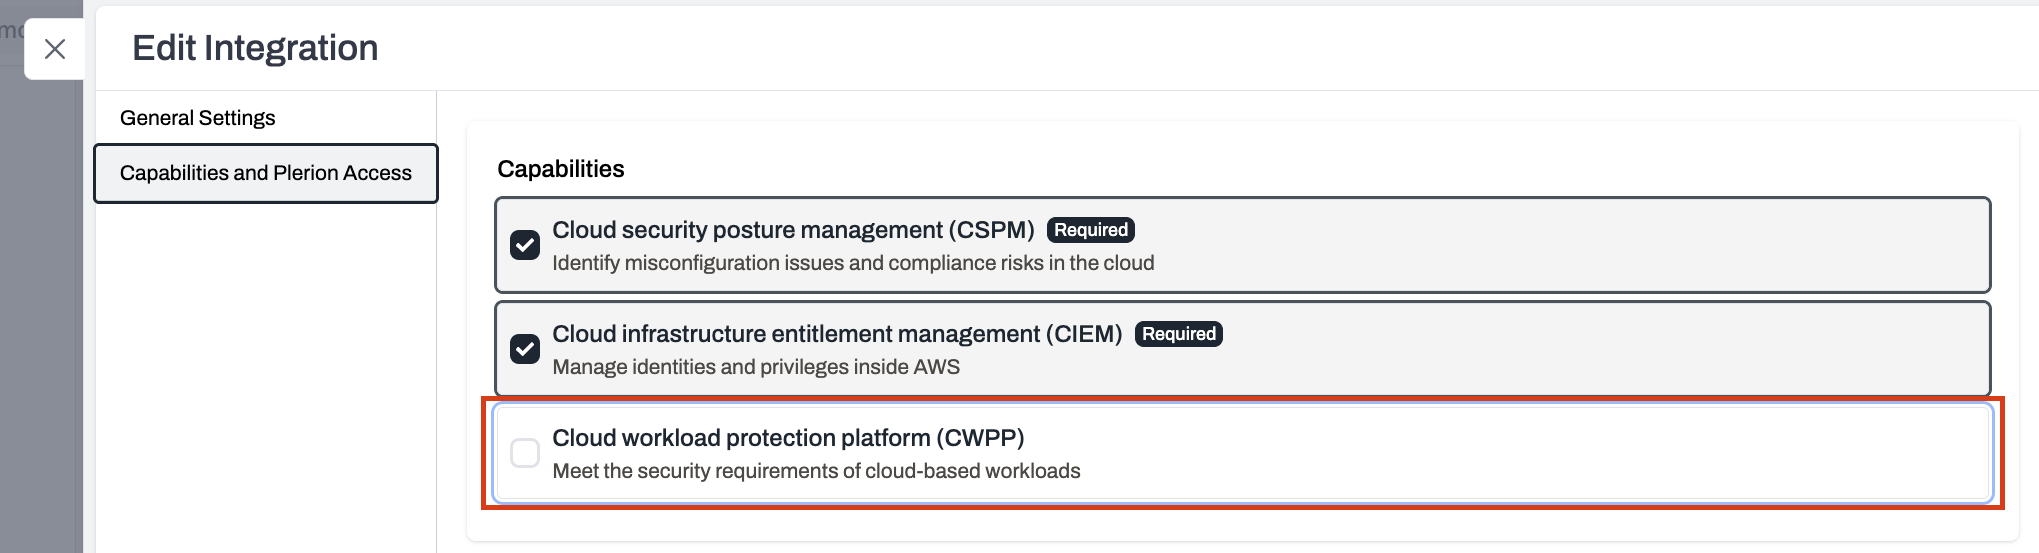 On the **Review** page, tick the required **Capabilities** box.
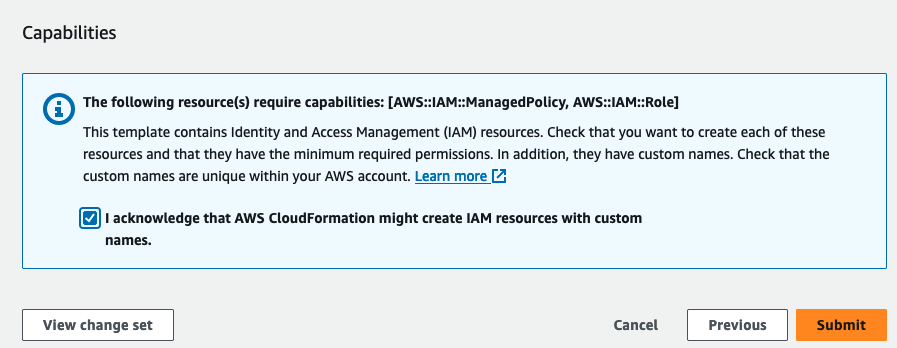 * In AWS, click `Update stack` to apply the changes.
* Plerion will automatically detect the updated resources and refresh the integration when the update completes.
***
#### Update existing stack using the CLI
* On the Plerion dashboard, go to `Settings` > `Integrations`, and find the AWS account you want to update
* Click the edit icon next to **Role ARN**
* In AWS, click `Update stack` to apply the changes.
* Plerion will automatically detect the updated resources and refresh the integration when the update completes.
***
#### Update existing stack using the CLI
* On the Plerion dashboard, go to `Settings` > `Integrations`, and find the AWS account you want to update
* Click the edit icon next to **Role ARN**
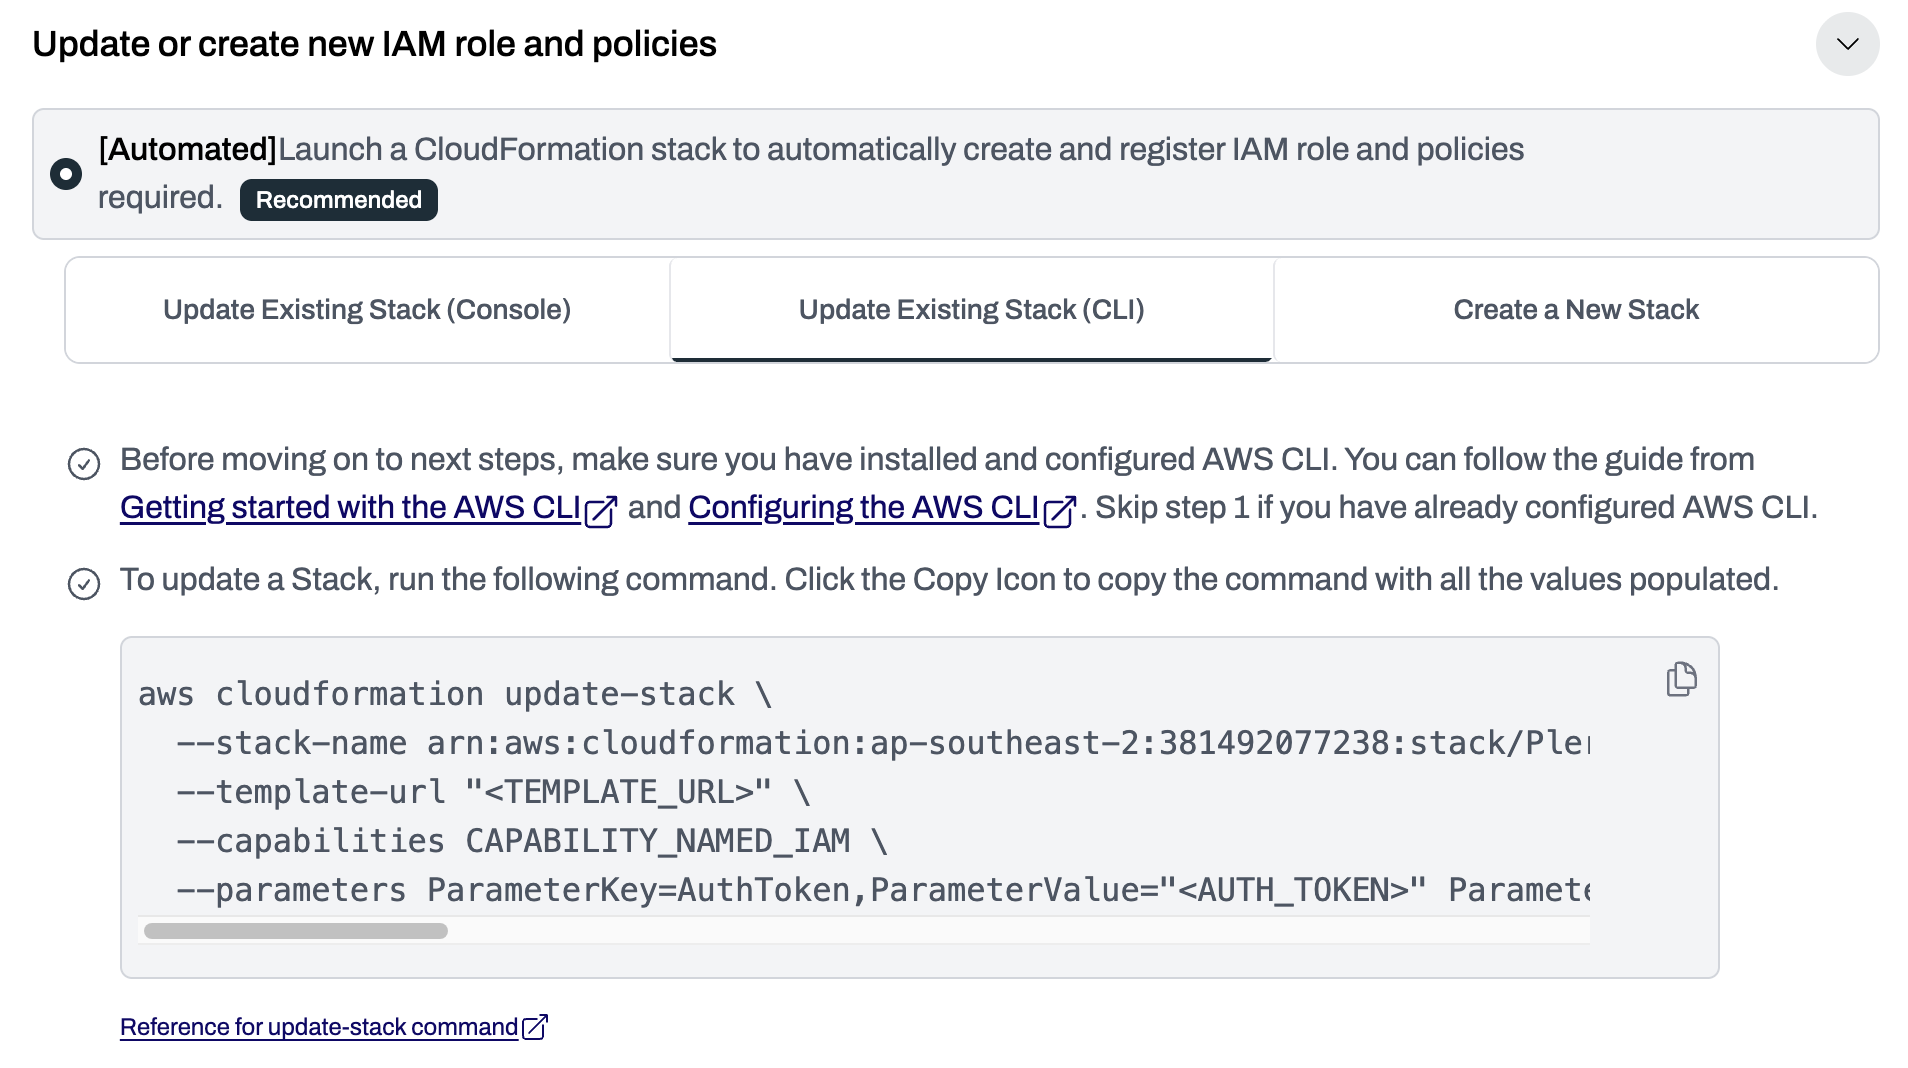 Copy all values from Plerion’s **Stack Parameters** box into the CLI command.
* Execute the command in your terminal.
* Plerion will automatically detect the updated resources once the update completes.
***
#### Create a new stack
* On the Plerion dashboard, go to `Settings` > `Integrations`, and find the AWS account you want to update
* Click the edit icon next to **Role ARN**
Copy all values from Plerion’s **Stack Parameters** box into the CLI command.
* Execute the command in your terminal.
* Plerion will automatically detect the updated resources once the update completes.
***
#### Create a new stack
* On the Plerion dashboard, go to `Settings` > `Integrations`, and find the AWS account you want to update
* Click the edit icon next to **Role ARN**
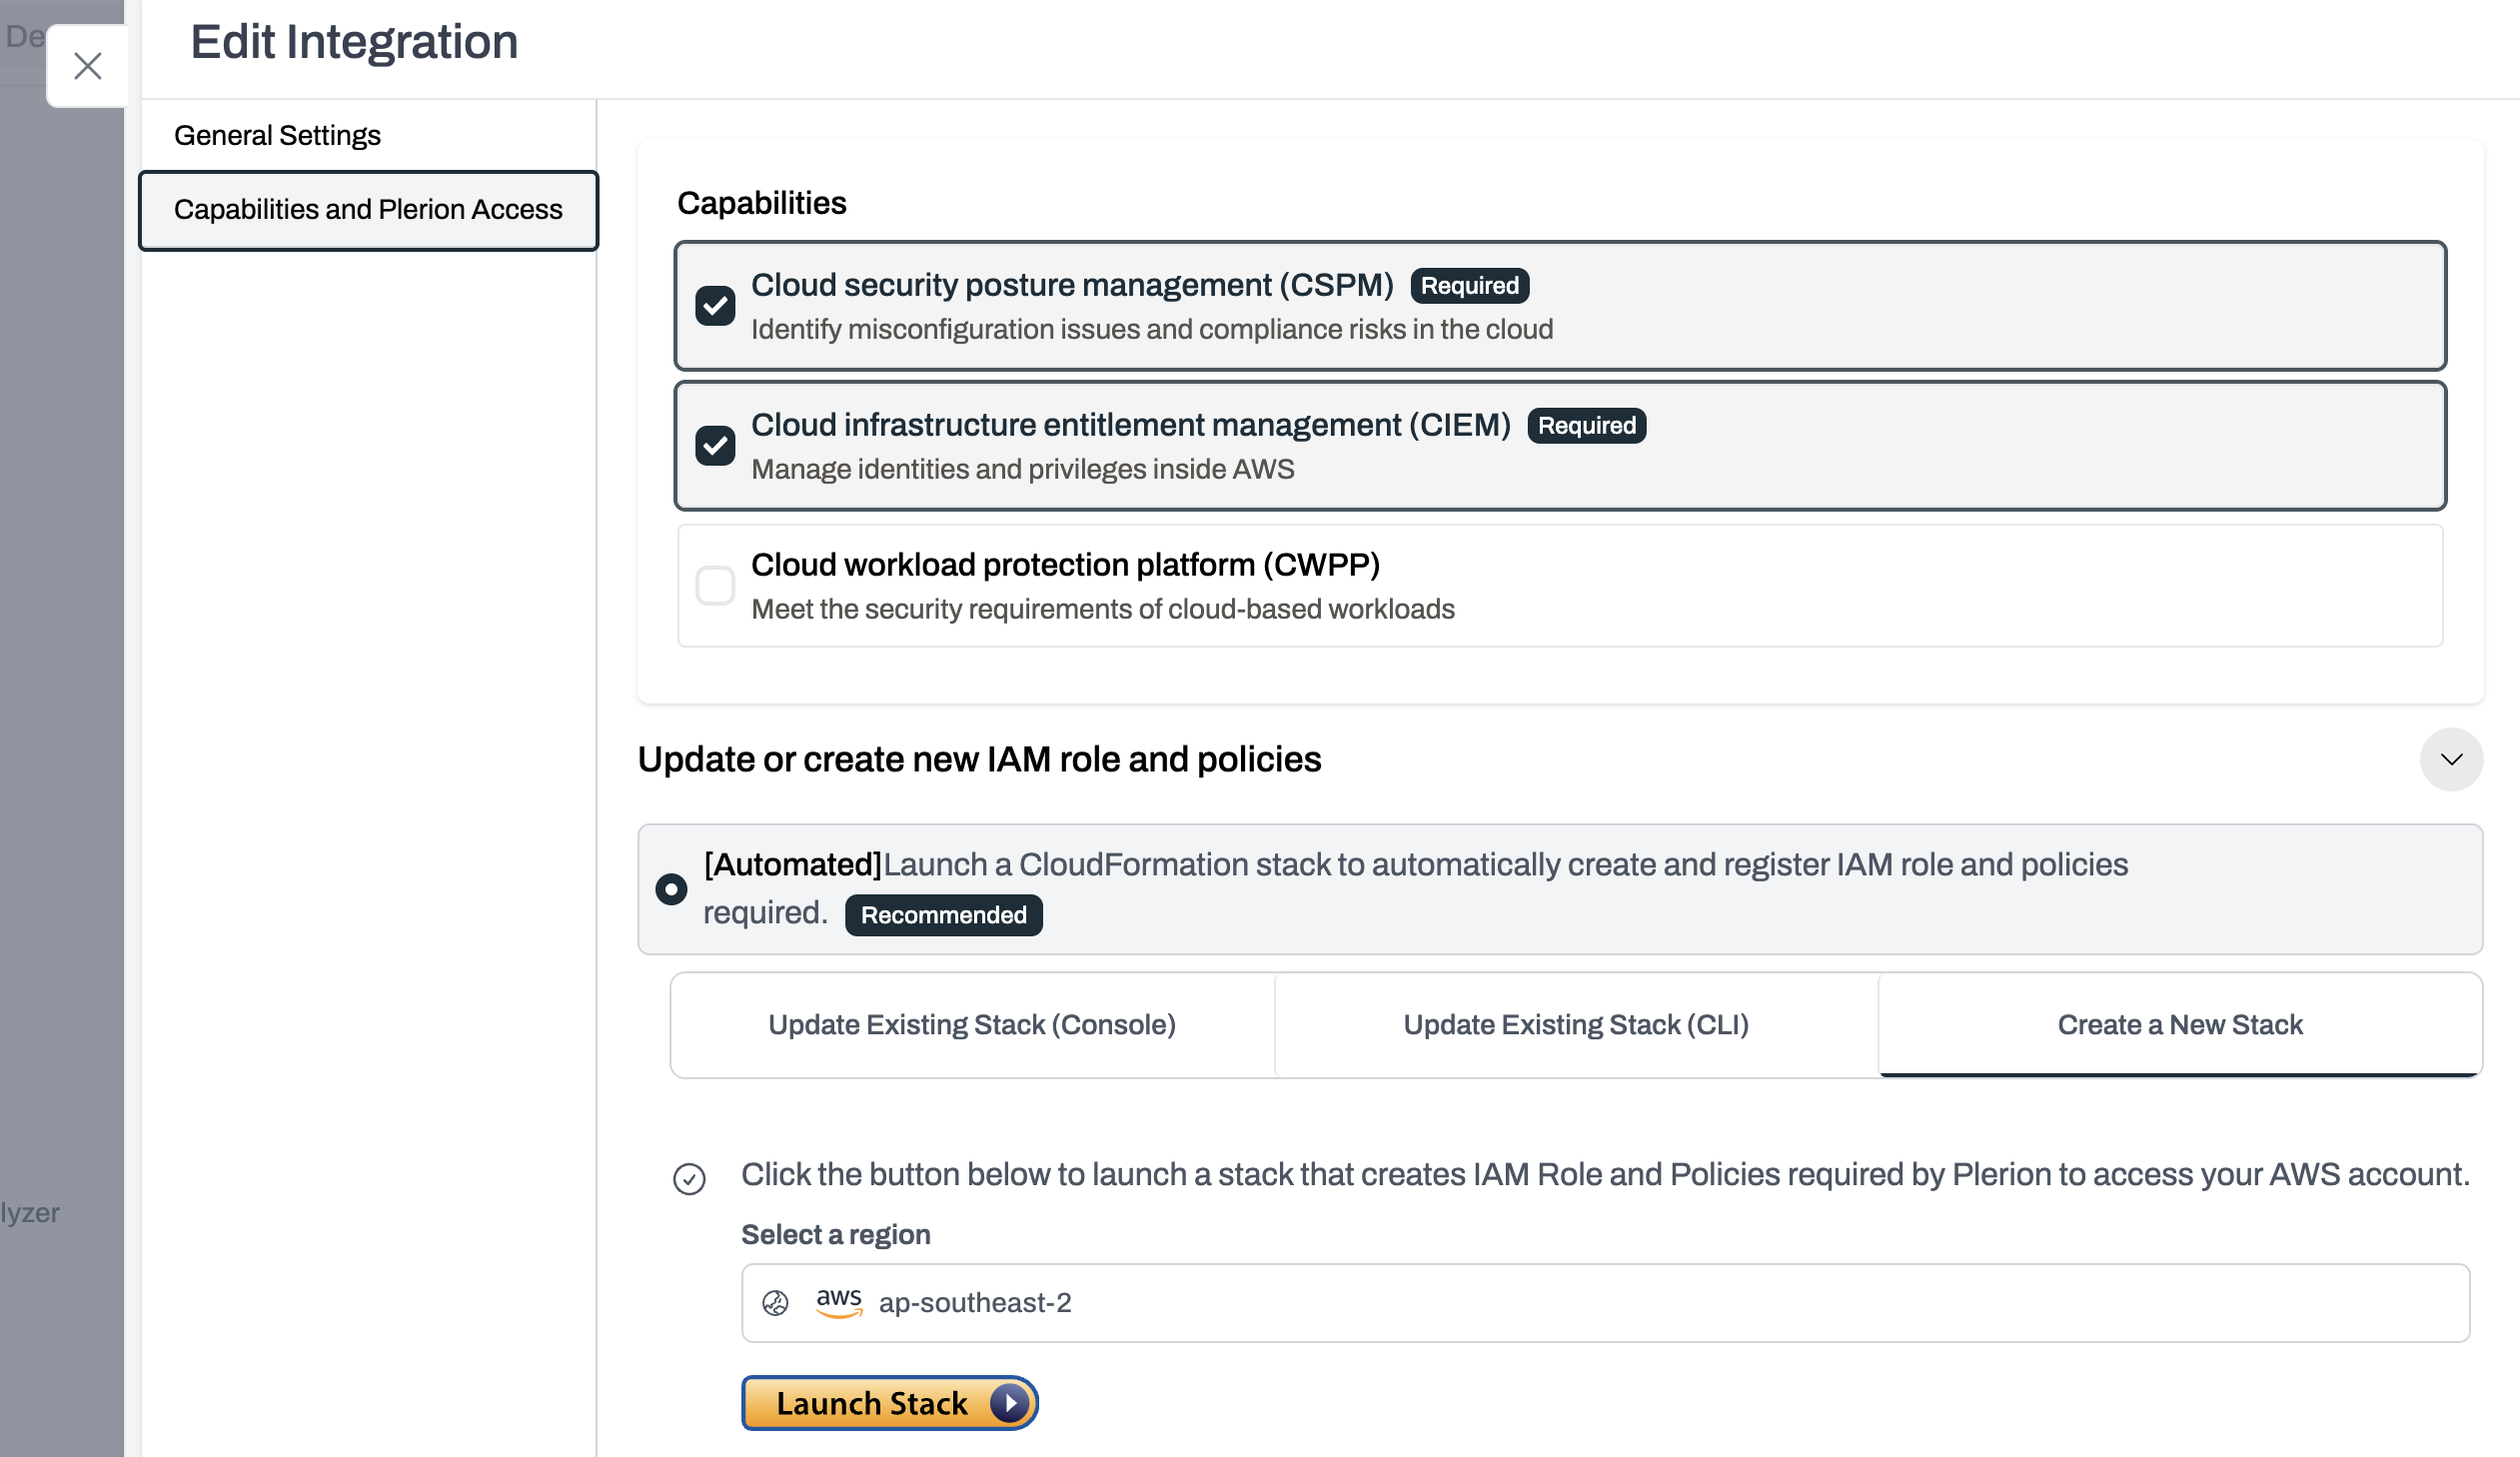 Follow the on-screen instructions in AWS to create the new stack.
After deployment, Plerion will detect the new resources and refresh the integration.
***
### Manual mode
If you onboarded your AWS account using **Manual mode**, update the IAM role directly.
In your AWS account, open the IAM role used by Plerion and edit its configuration.
Replace the trust policy or permissions JSON with the updated values shown in Plerion.
Save your changes in AWS, then return to Plerion and click `Update` to validate the integration.
***
## Steps for updating multiple AWS accounts
You can only update multiple accounts from the **management account** integration.
* On the Plerion dashboard, go to `Settings` > `Integrations`, and find the AWS management account you want to update
* Click the edit icon next to **Role ARN**
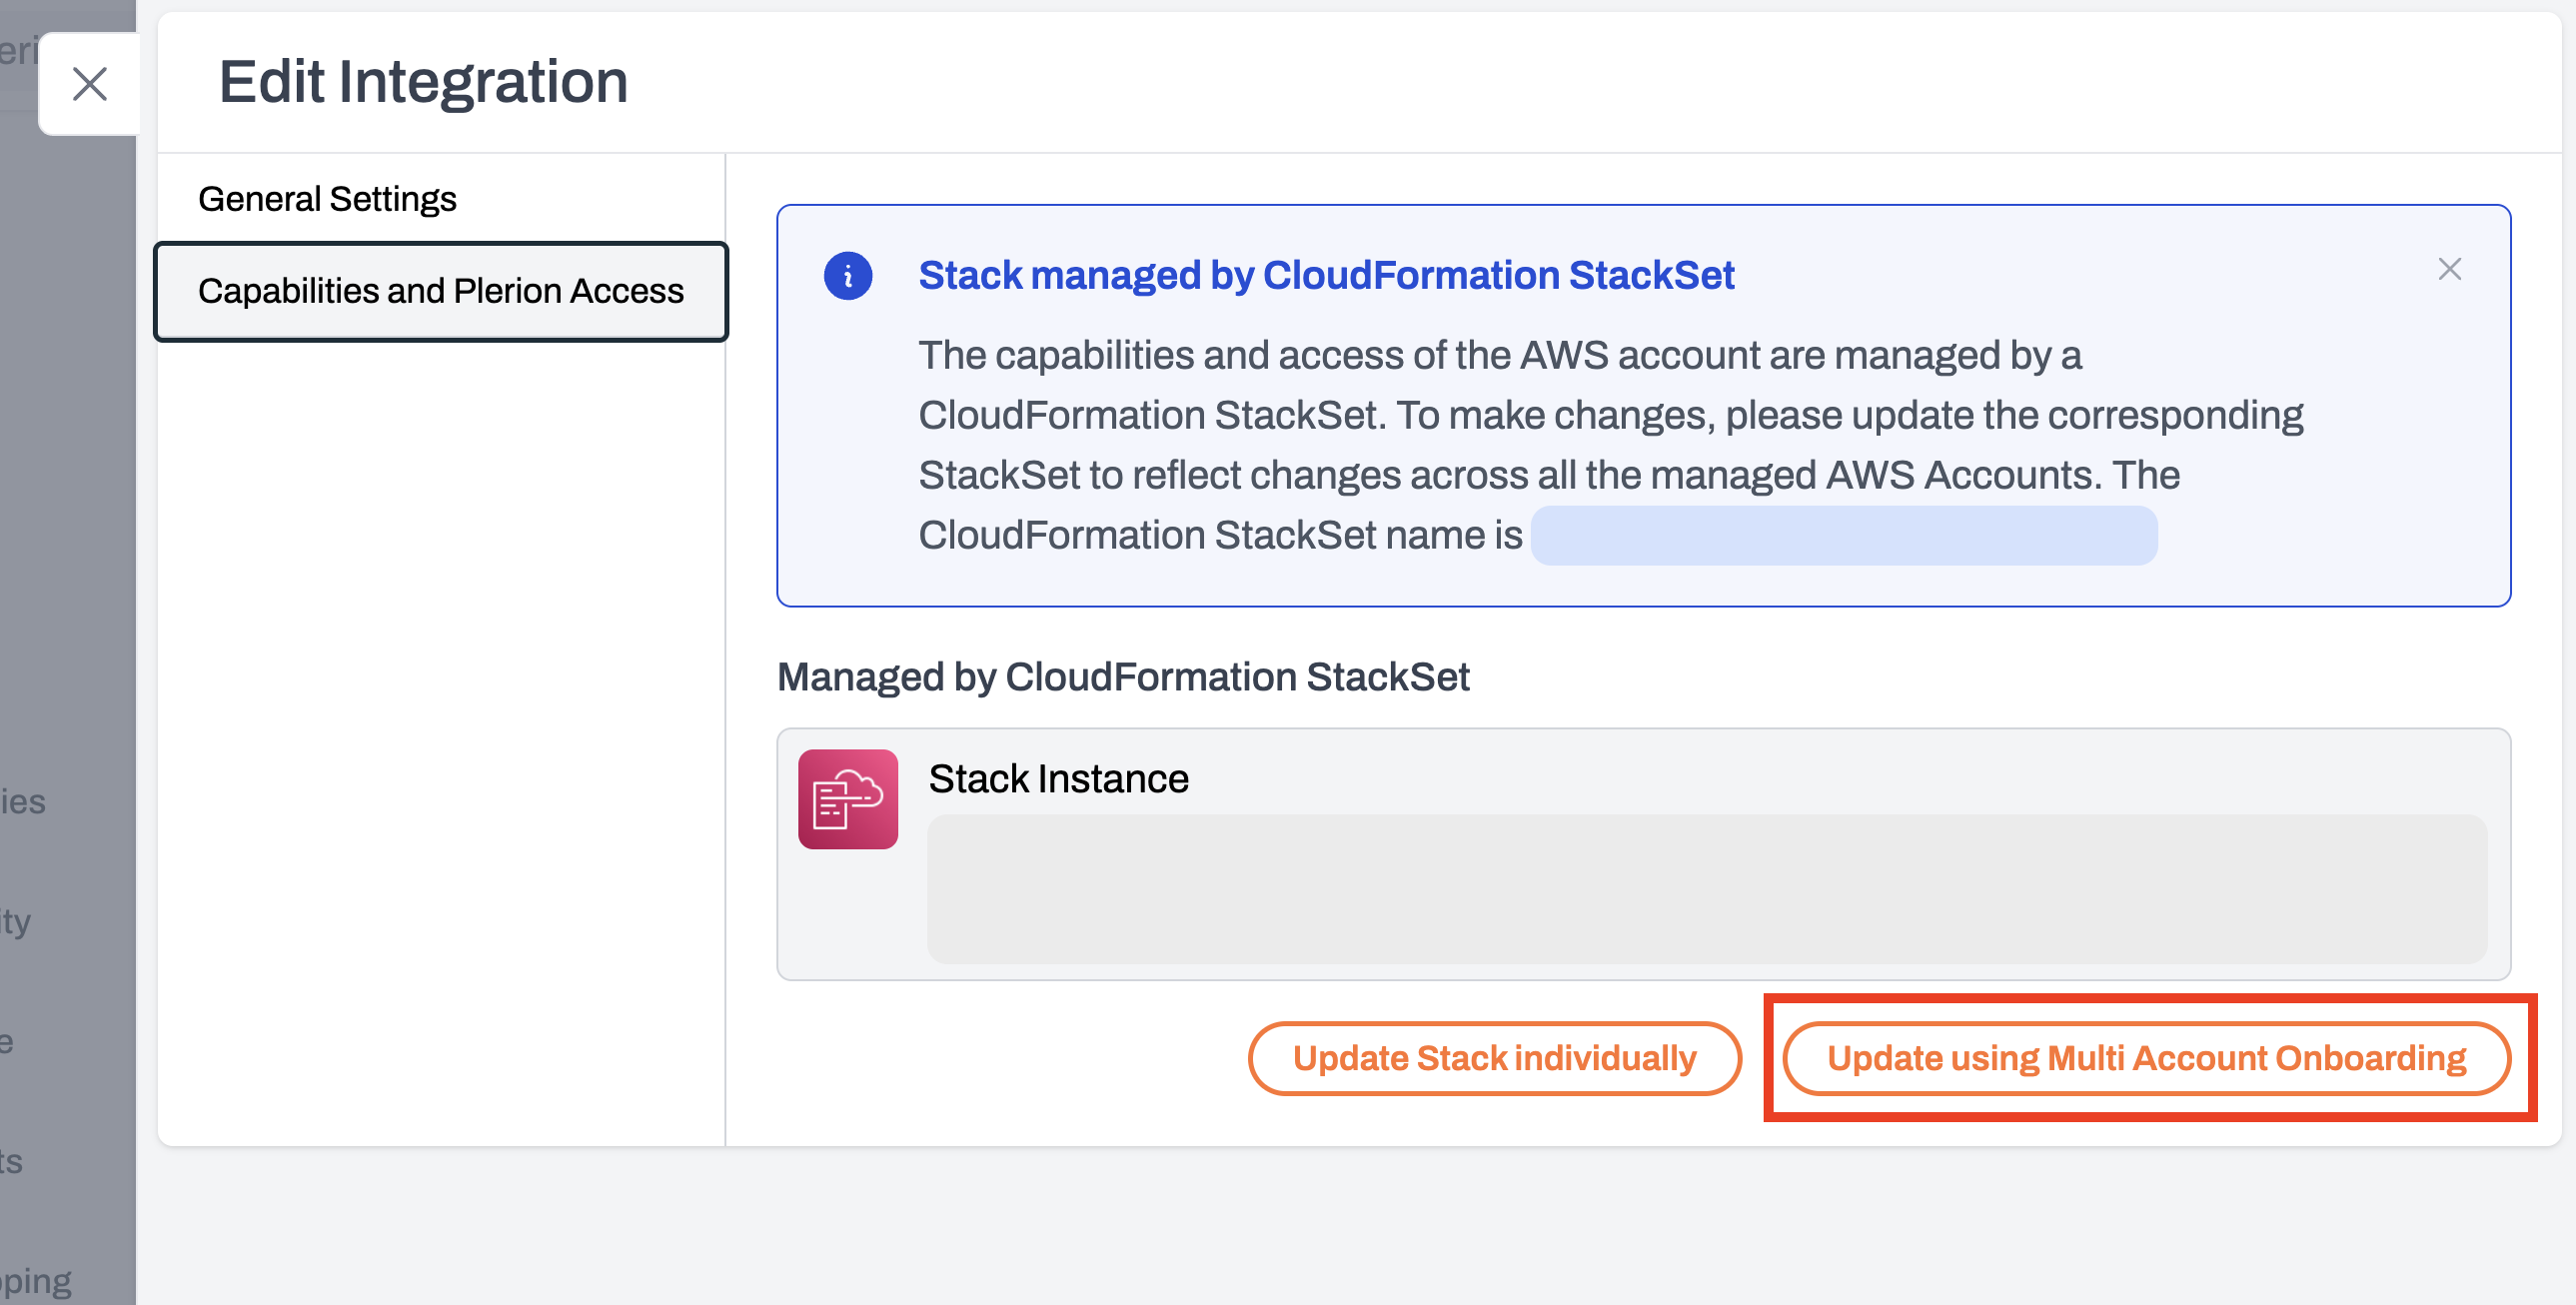
* On the **Edit integration** page, click `Update using Multi Account Onboarding`.
* On the **Select capabilities** screen, click `Next`.
Follow the on-screen instructions in AWS to create the new stack.
After deployment, Plerion will detect the new resources and refresh the integration.
***
### Manual mode
If you onboarded your AWS account using **Manual mode**, update the IAM role directly.
In your AWS account, open the IAM role used by Plerion and edit its configuration.
Replace the trust policy or permissions JSON with the updated values shown in Plerion.
Save your changes in AWS, then return to Plerion and click `Update` to validate the integration.
***
## Steps for updating multiple AWS accounts
You can only update multiple accounts from the **management account** integration.
* On the Plerion dashboard, go to `Settings` > `Integrations`, and find the AWS management account you want to update
* Click the edit icon next to **Role ARN**
* On the **Edit integration** page, click `Update using Multi Account Onboarding`.
* On the **Select capabilities** screen, click `Next`.
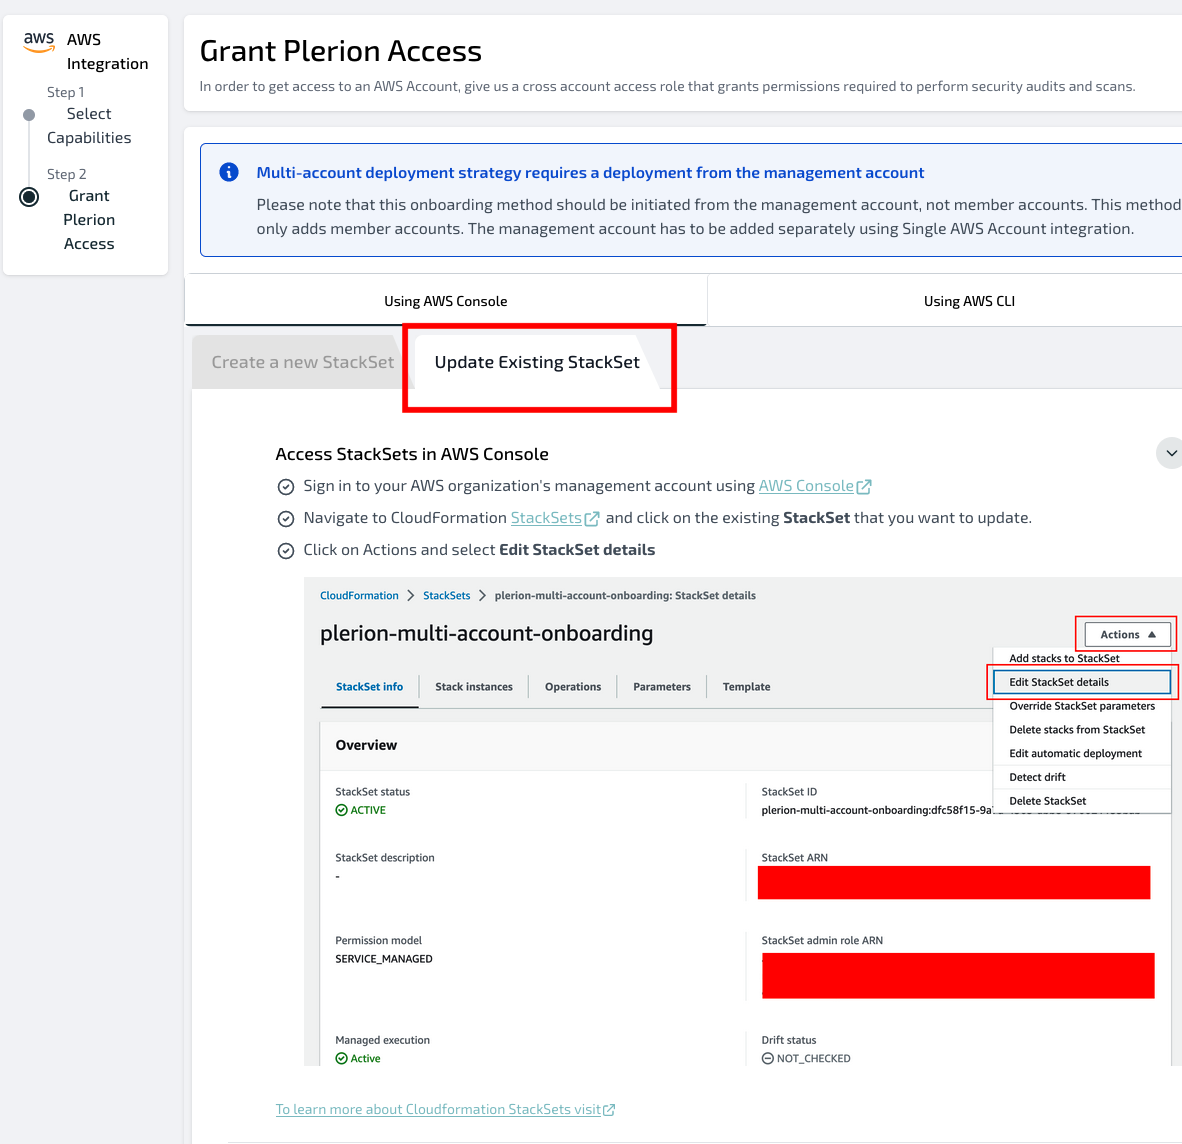 Copy the `AuthToken` value from Plerion’s **Stack Parameters** box into the matching field in AWS.
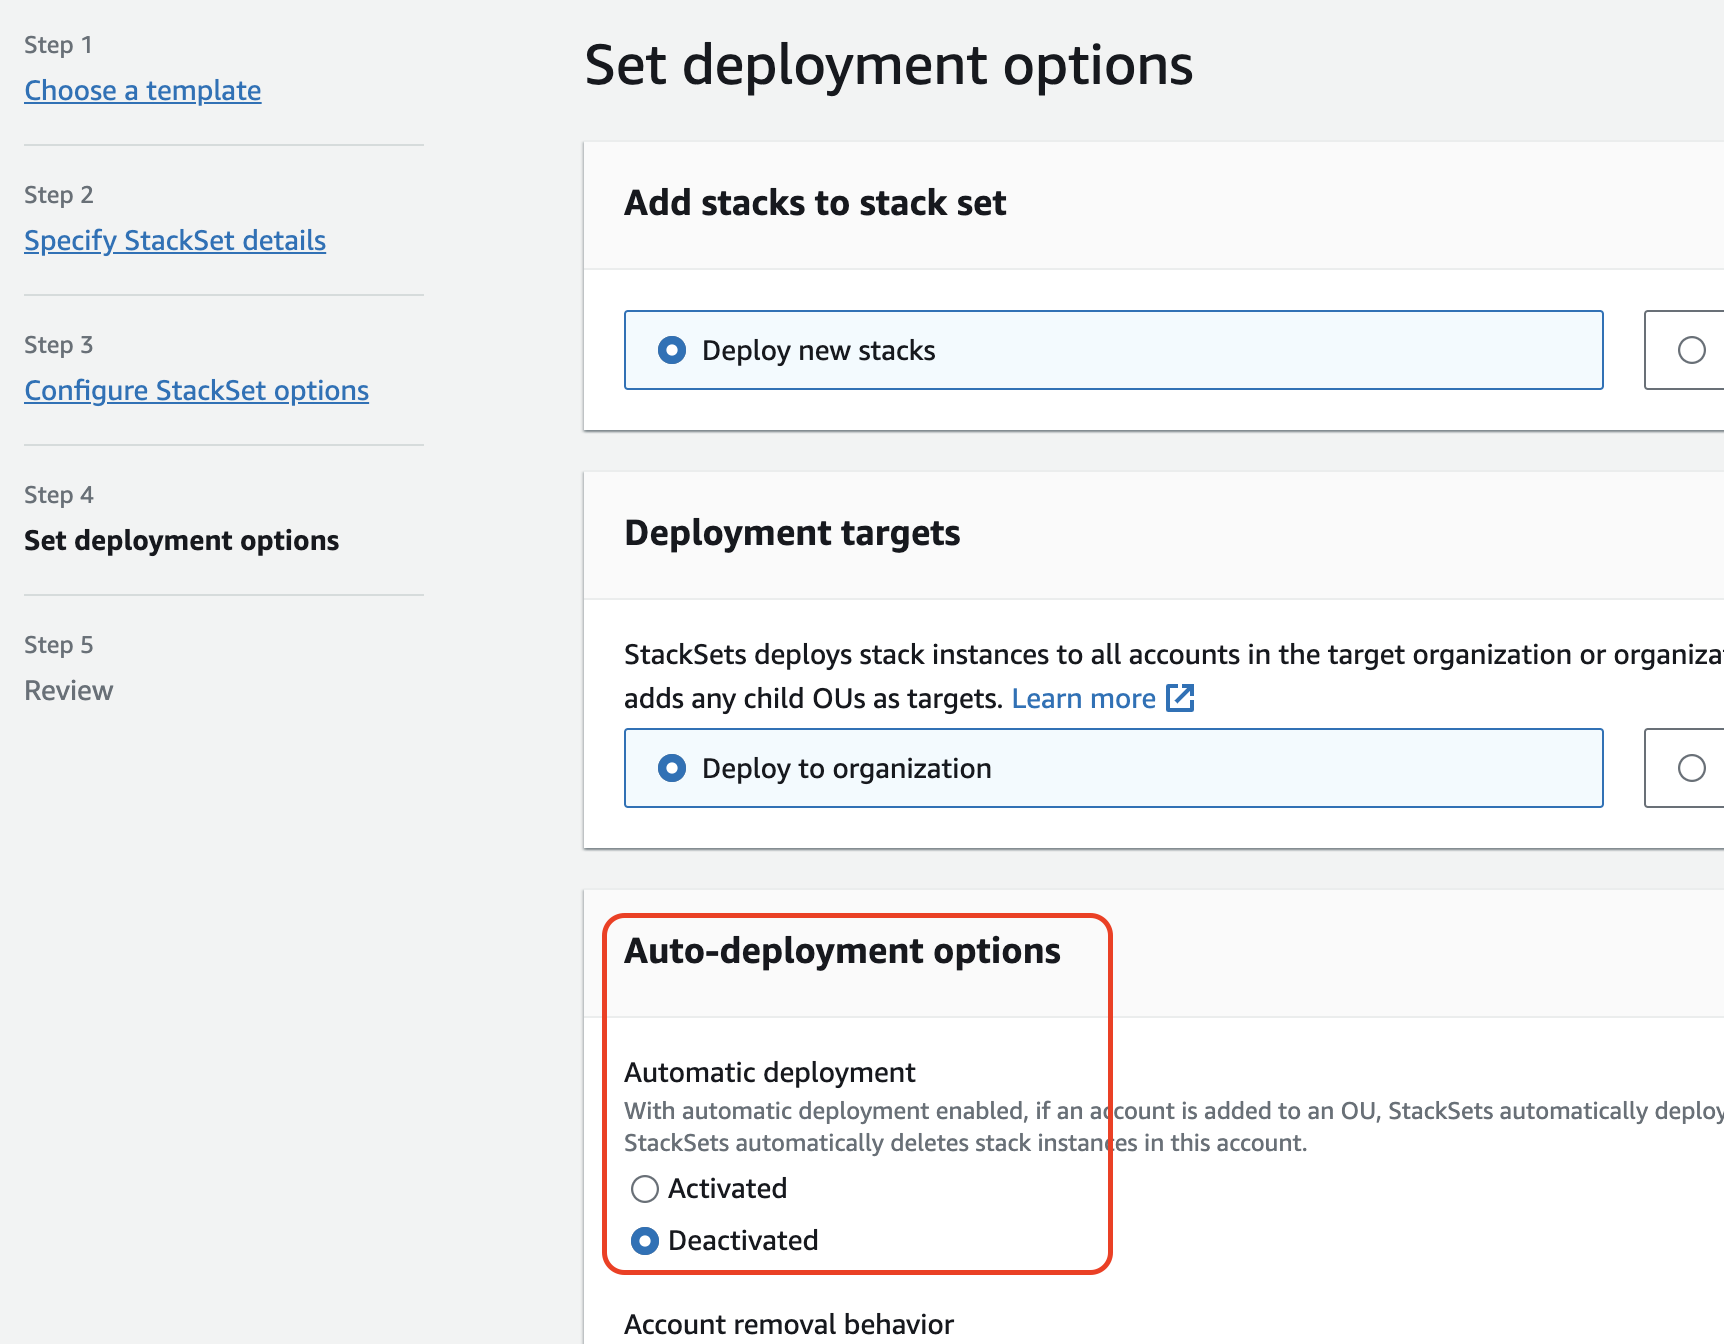
On the **Set deployment options** page in AWS, set **Automatic deployment** to `Deactivated`.
Copy the `AuthToken` value from Plerion’s **Stack Parameters** box into the matching field in AWS.
On the **Set deployment options** page in AWS, set **Automatic deployment** to `Deactivated`.
 * On the **Review** page in CloudFormation, tick the required **Capabilities** box, then click `Submit`.
* Plerion will automatically detect the updated StackSet resources once the update completes.
* On the **Review** page in CloudFormation, tick the required **Capabilities** box, then click `Submit`.
* Plerion will automatically detect the updated StackSet resources once the update completes.