> ## Documentation Index
> Fetch the complete documentation index at: https://docs.plerion.com/llms.txt
> Use this file to discover all available pages before exploring further.
# Getting started with an AWS account
> Learn how to connect a single Amazon Web Services (AWS) account to Plerion for CSPM, CIEM, and CWPP capabilities.
For a smoother onboarding experience, log in to your **target AWS account** in the AWS Management Console before starting the setup in Plerion.
## Steps to enable CSPM and CIEM for your AWS account
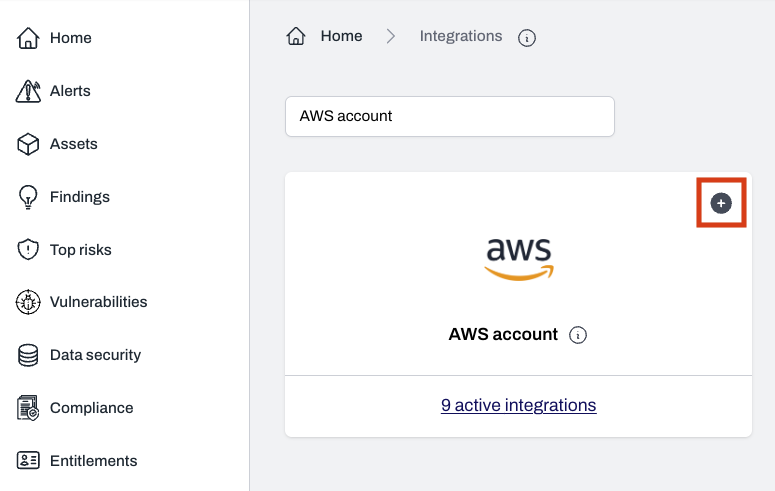
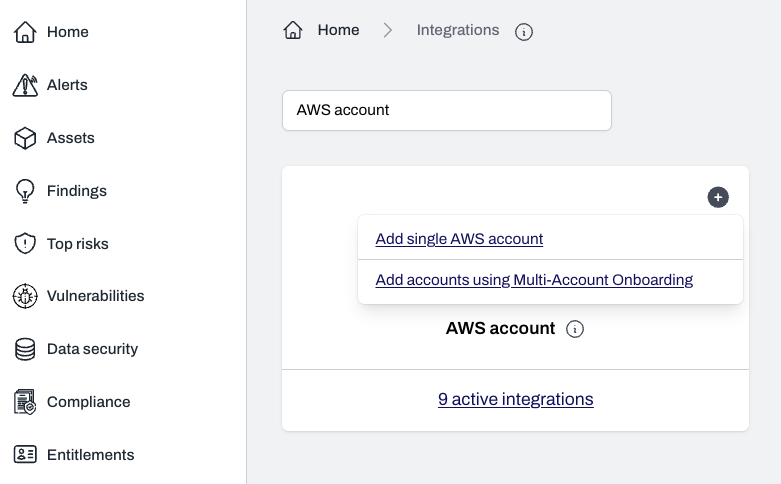
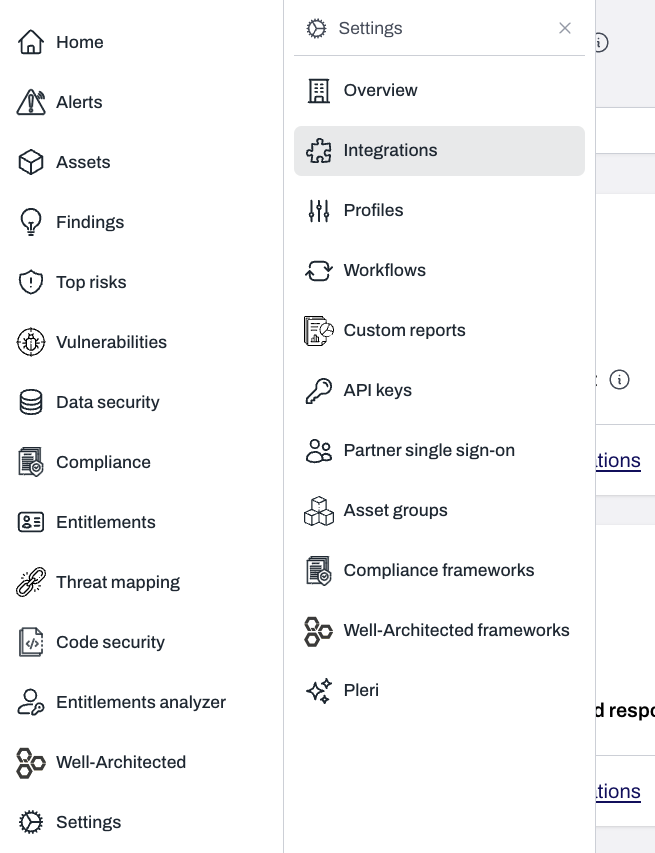 Click `Add single AWS account` to continue with onboarding a single AWS account.\
Click `Add accounts using Multi-Account Onbooarding` to add mutiple AWS accounts at once.
Click `Add single AWS account` to continue with onboarding a single AWS account.\
Click `Add accounts using Multi-Account Onbooarding` to add mutiple AWS accounts at once.
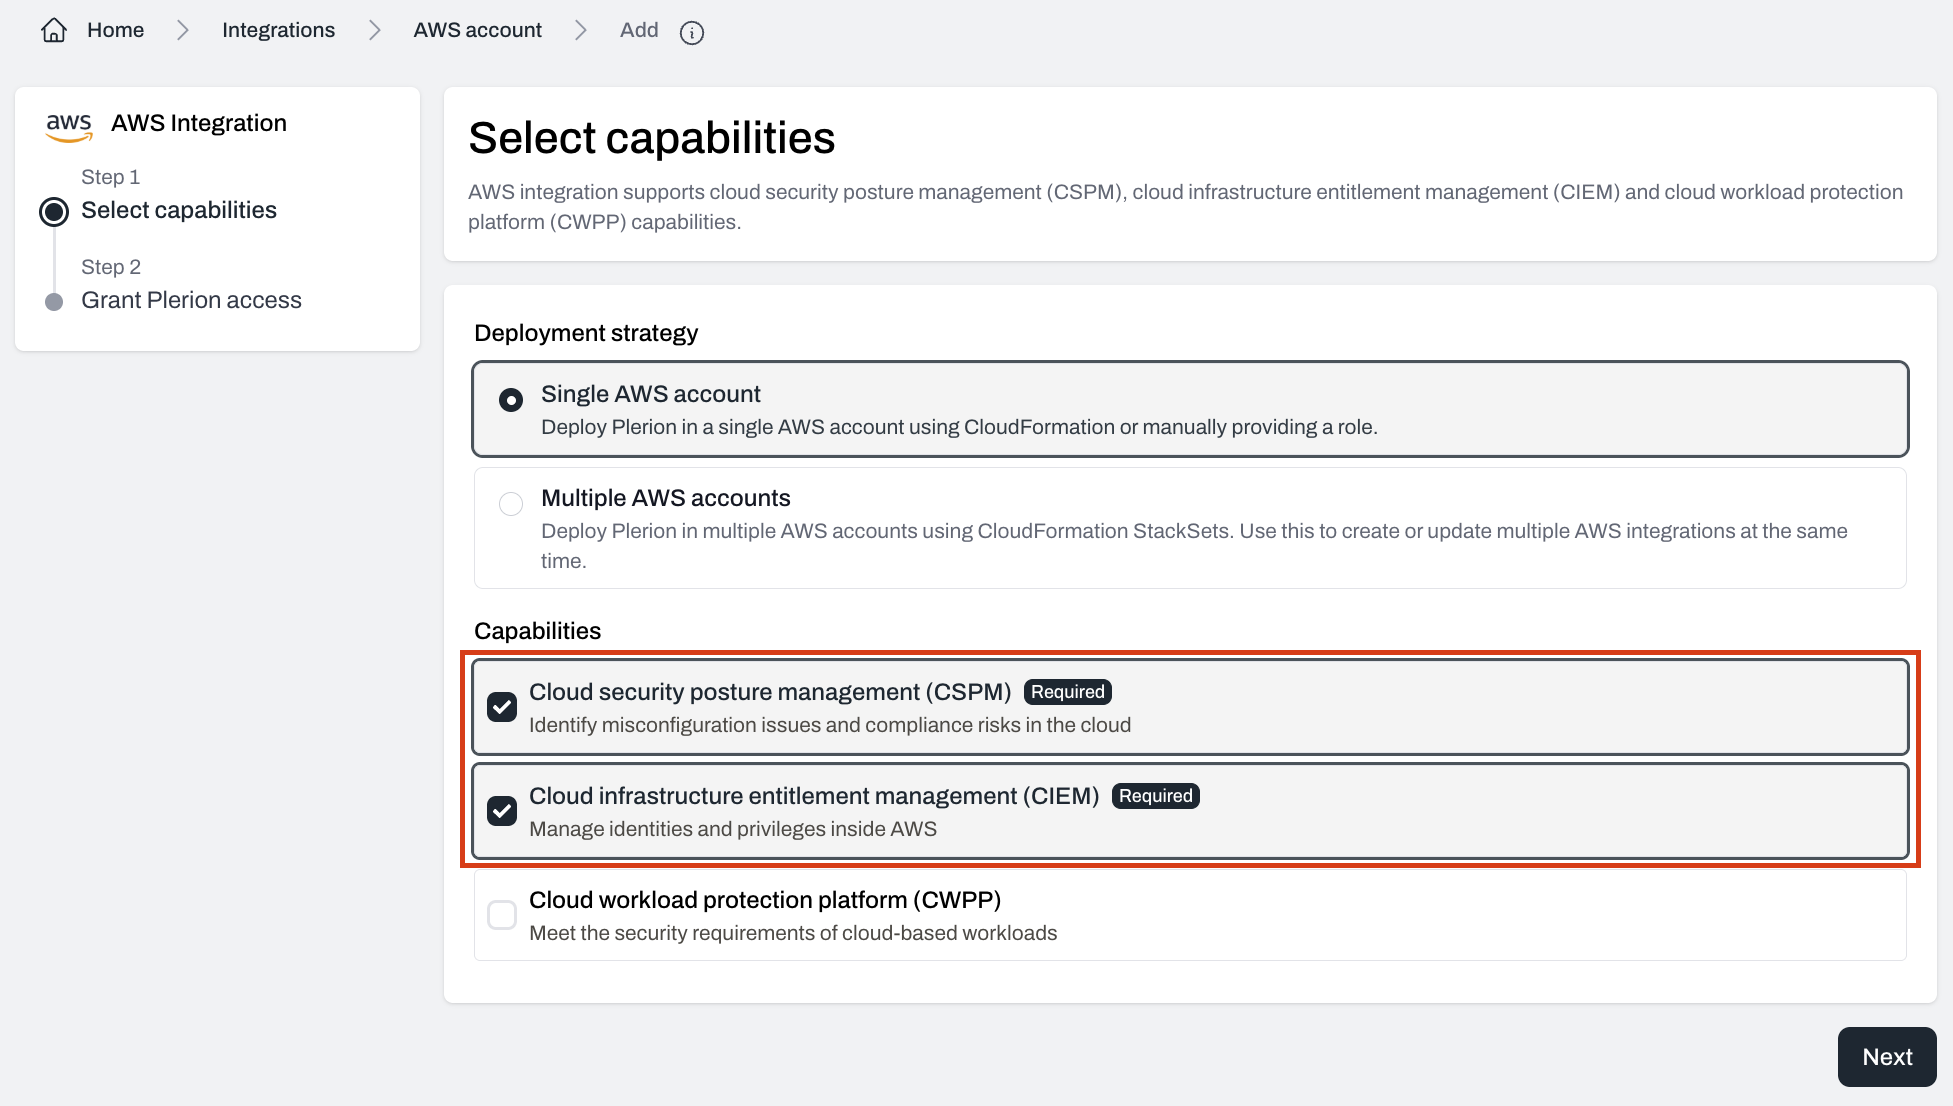
 The CSPM and CIEM capabilities are selected by default.\
Click `Next` to continue.
The CSPM and CIEM capabilities are selected by default.\
Click `Next` to continue.
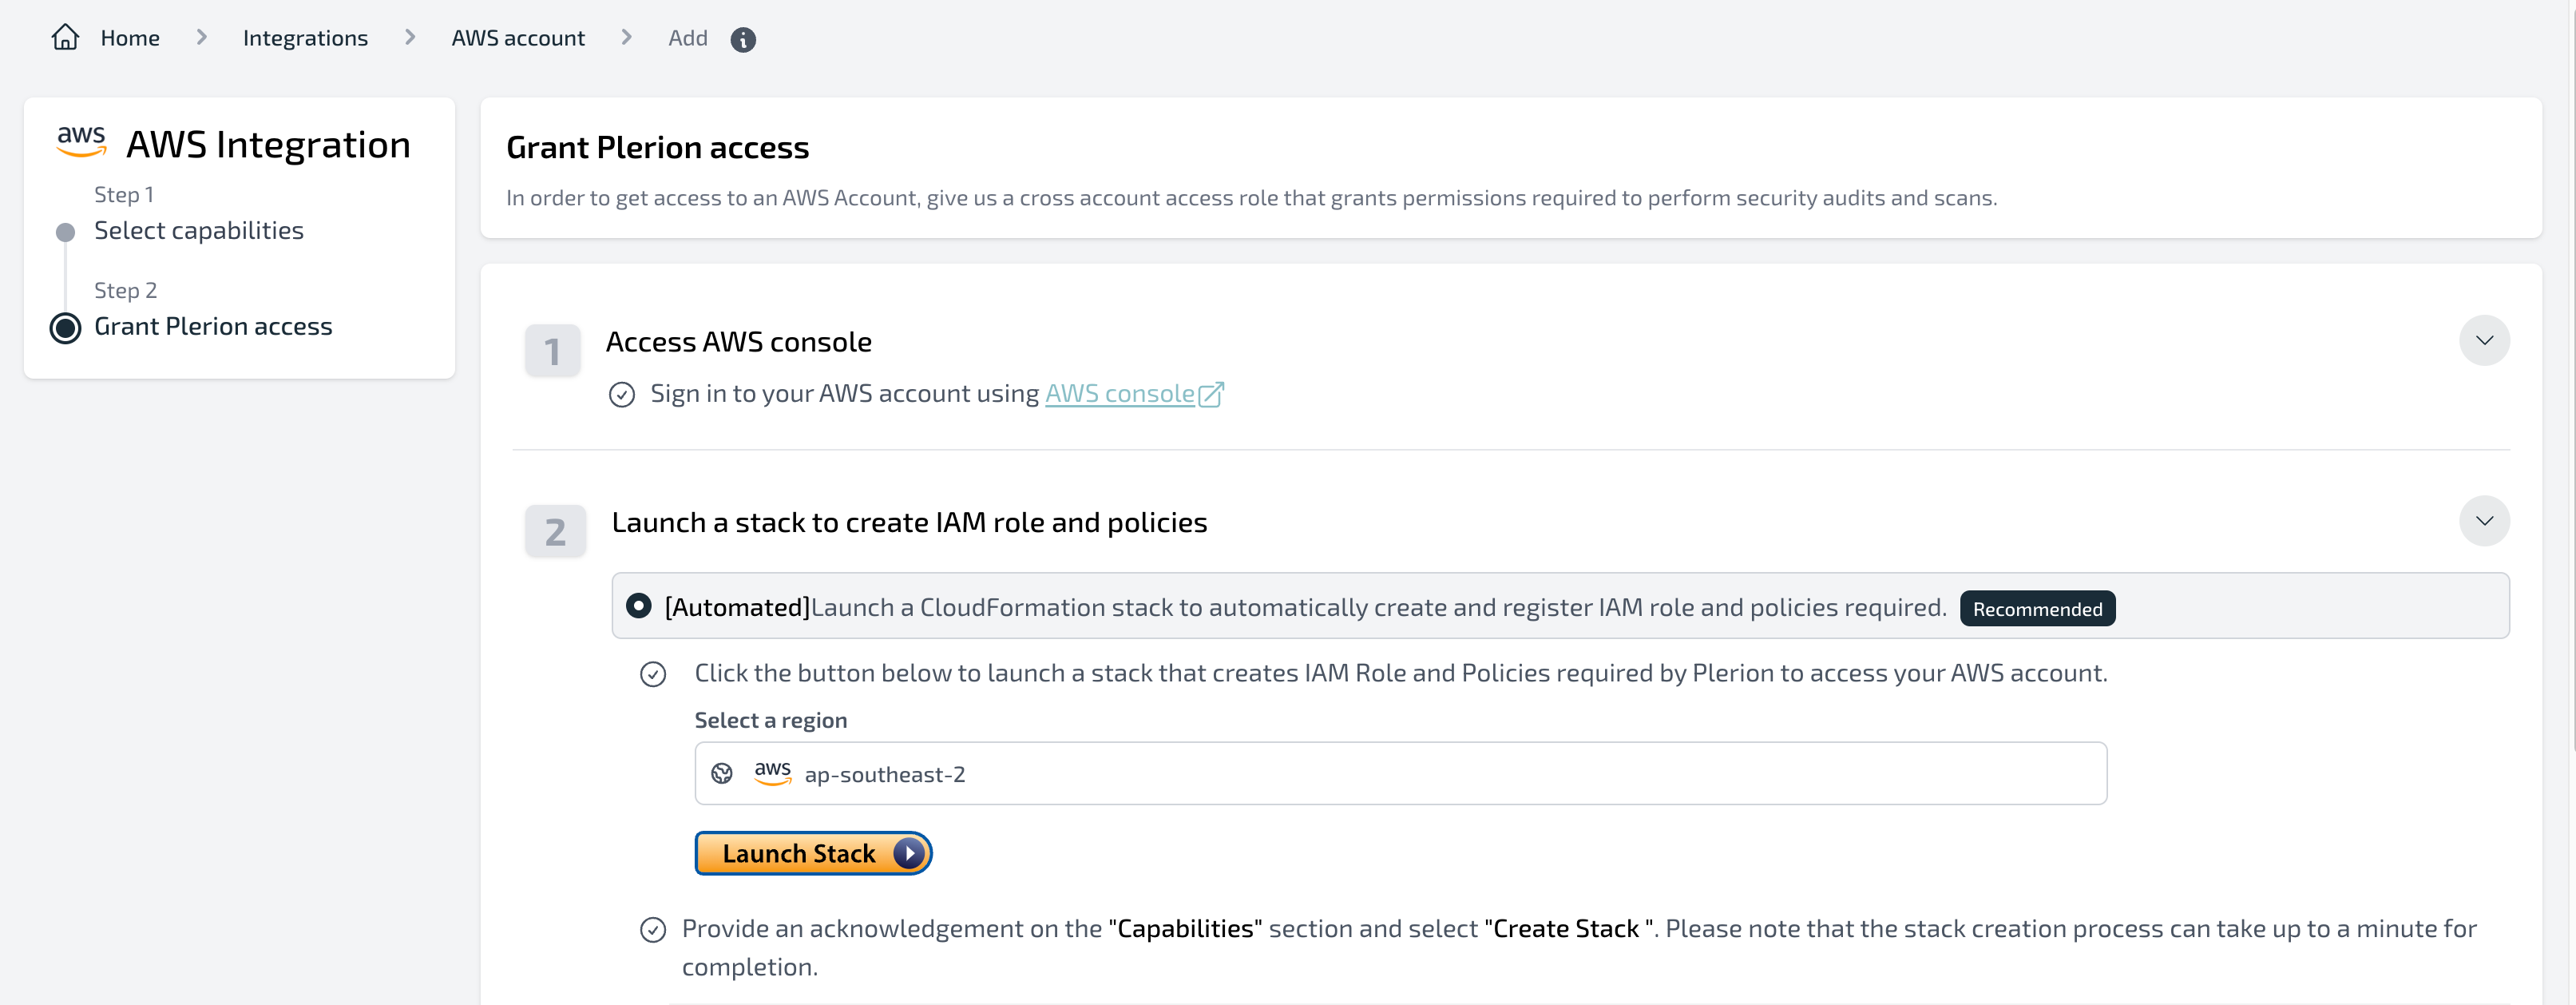
 You can grant Plerion access using either **Automated** *(recommended)* or **Manual** mode:
### Automated mode (recommended)
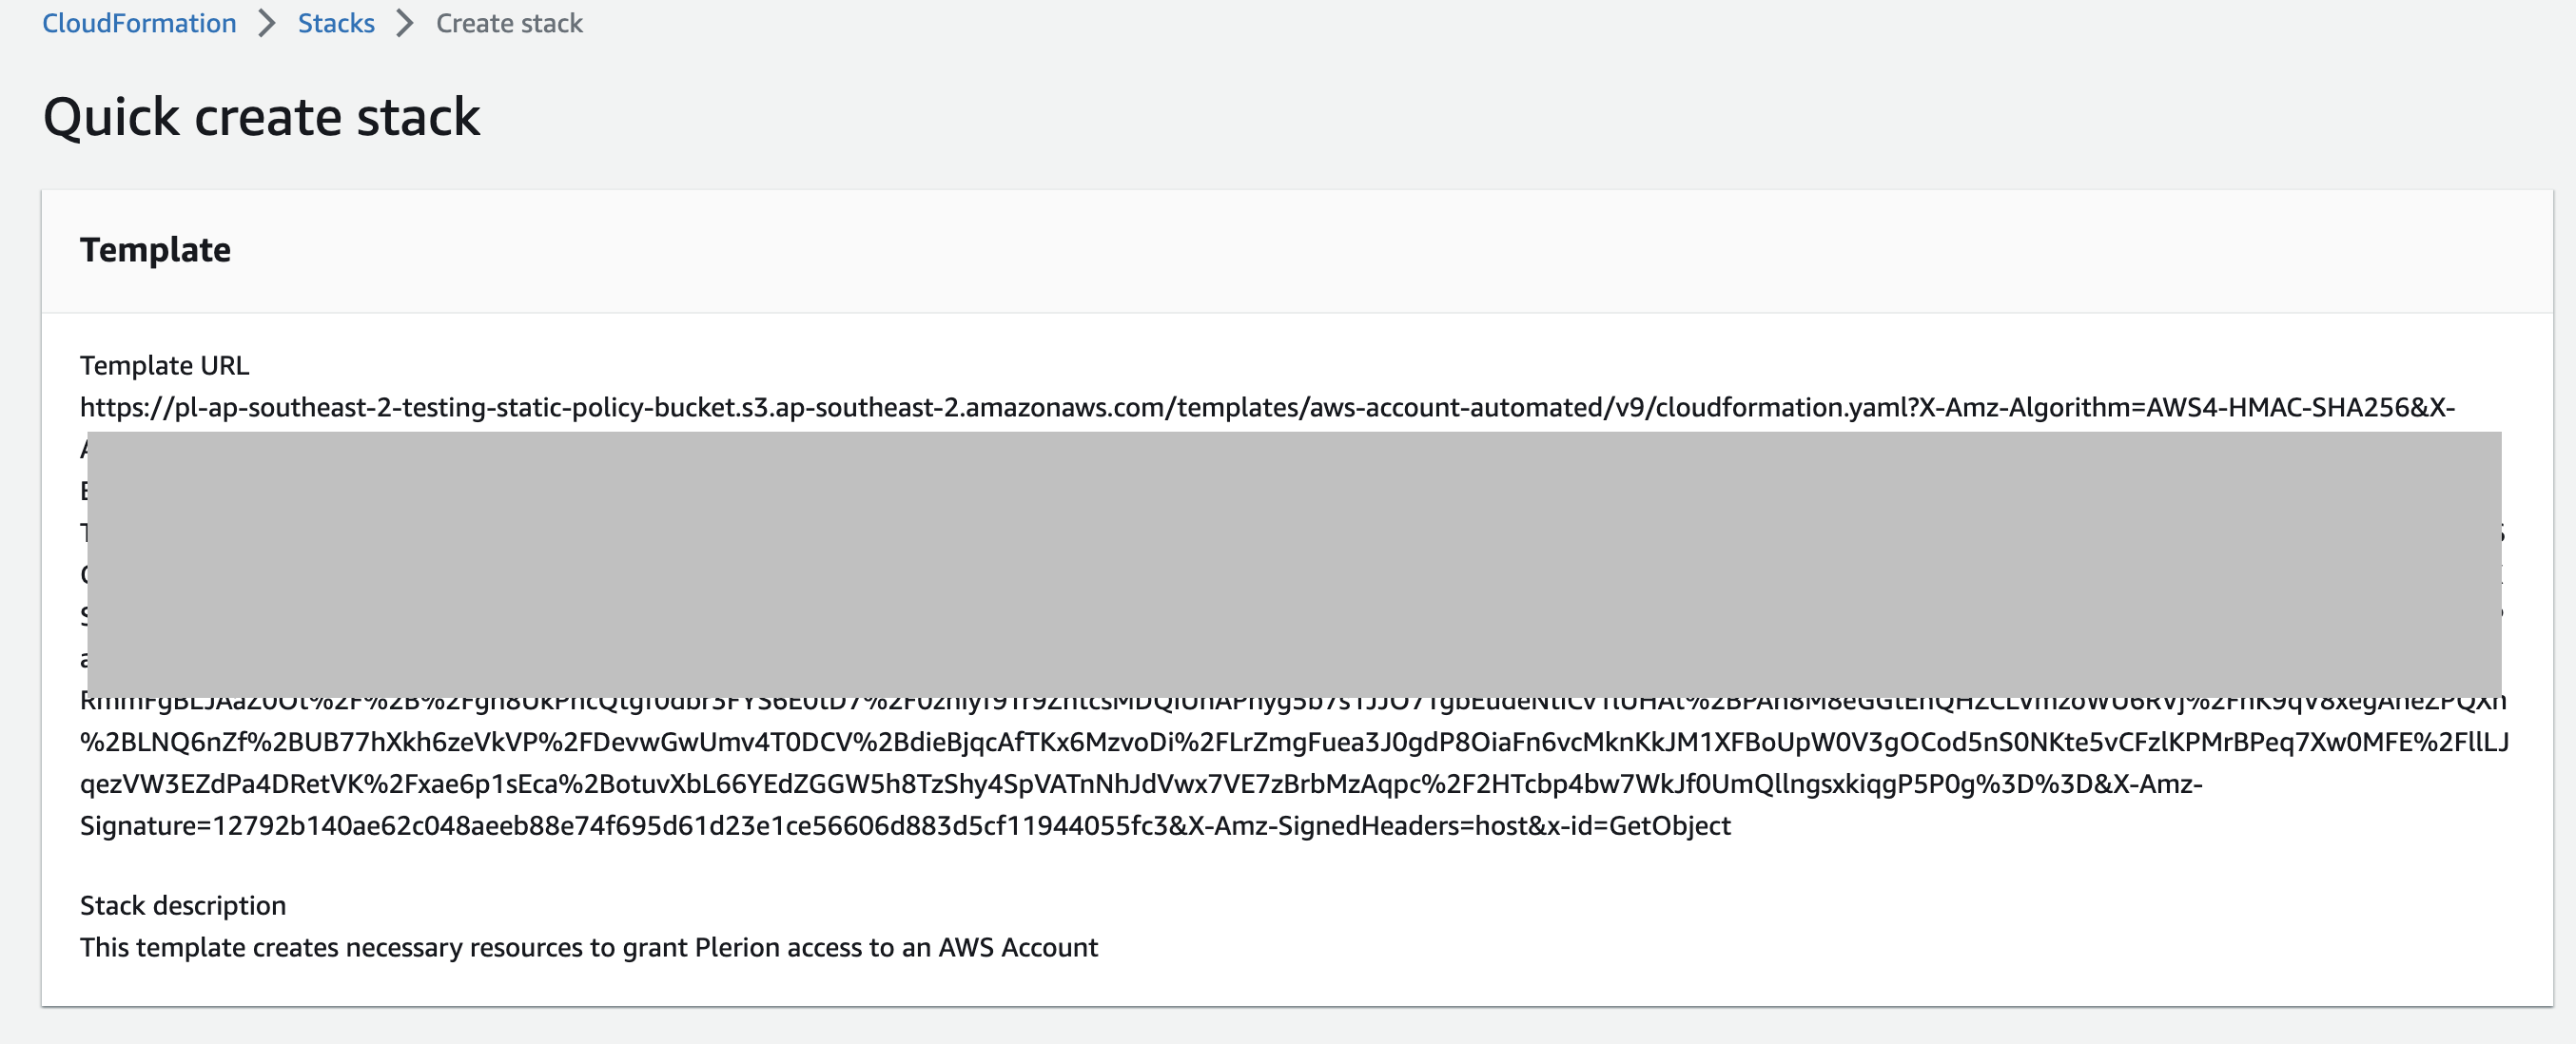
* Click `Launch stack` to open the **Quick create stack** page in AWS CloudFormation.
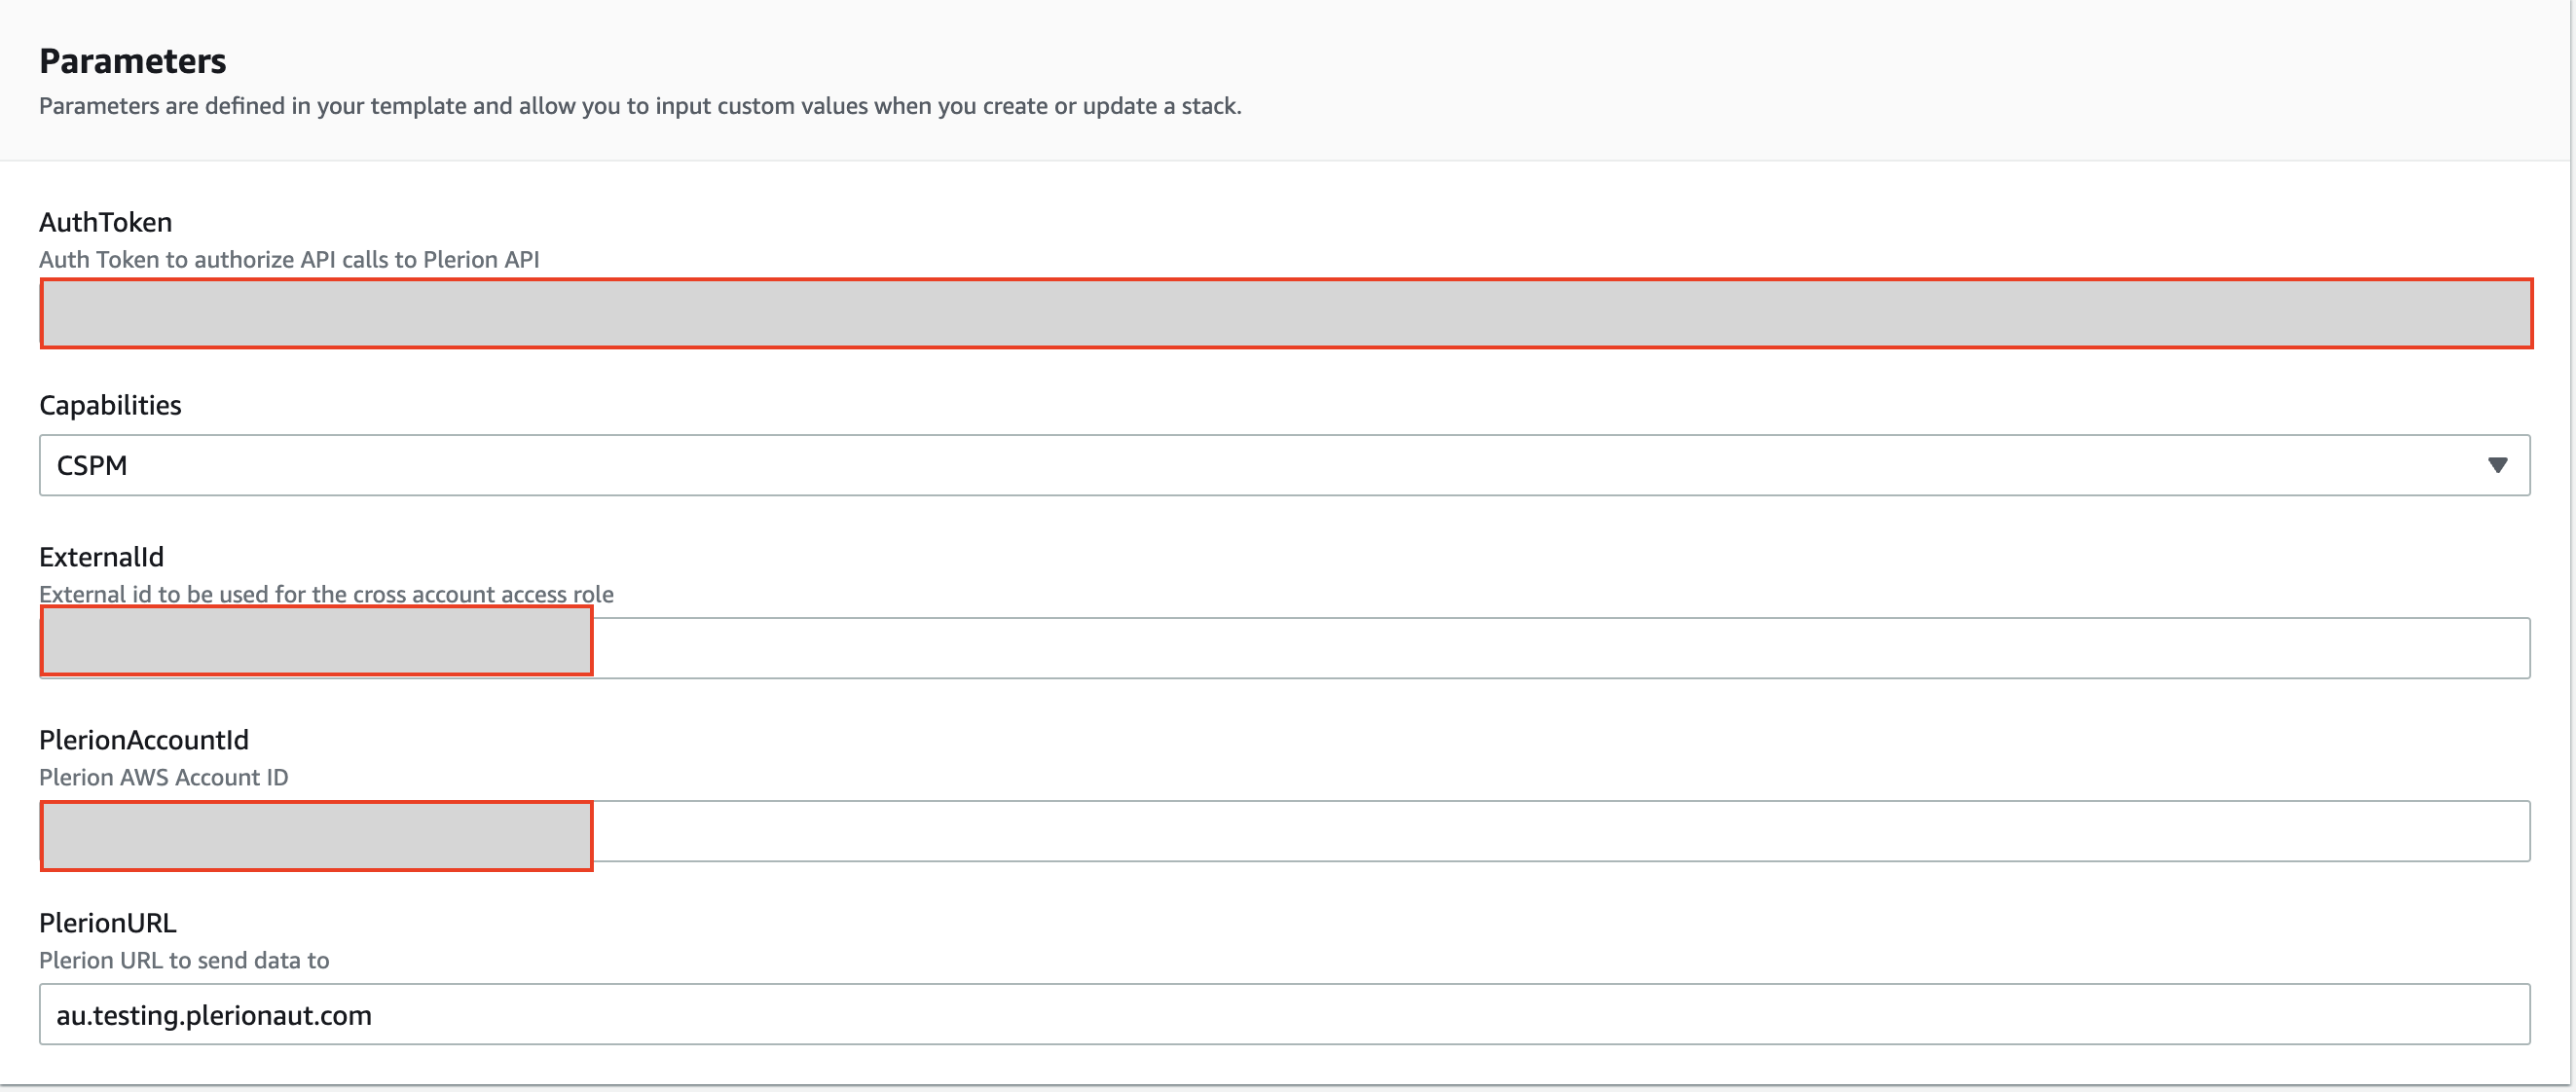
* Keep the default parameters and acknowledge required capabilities, then click `Create stack`.
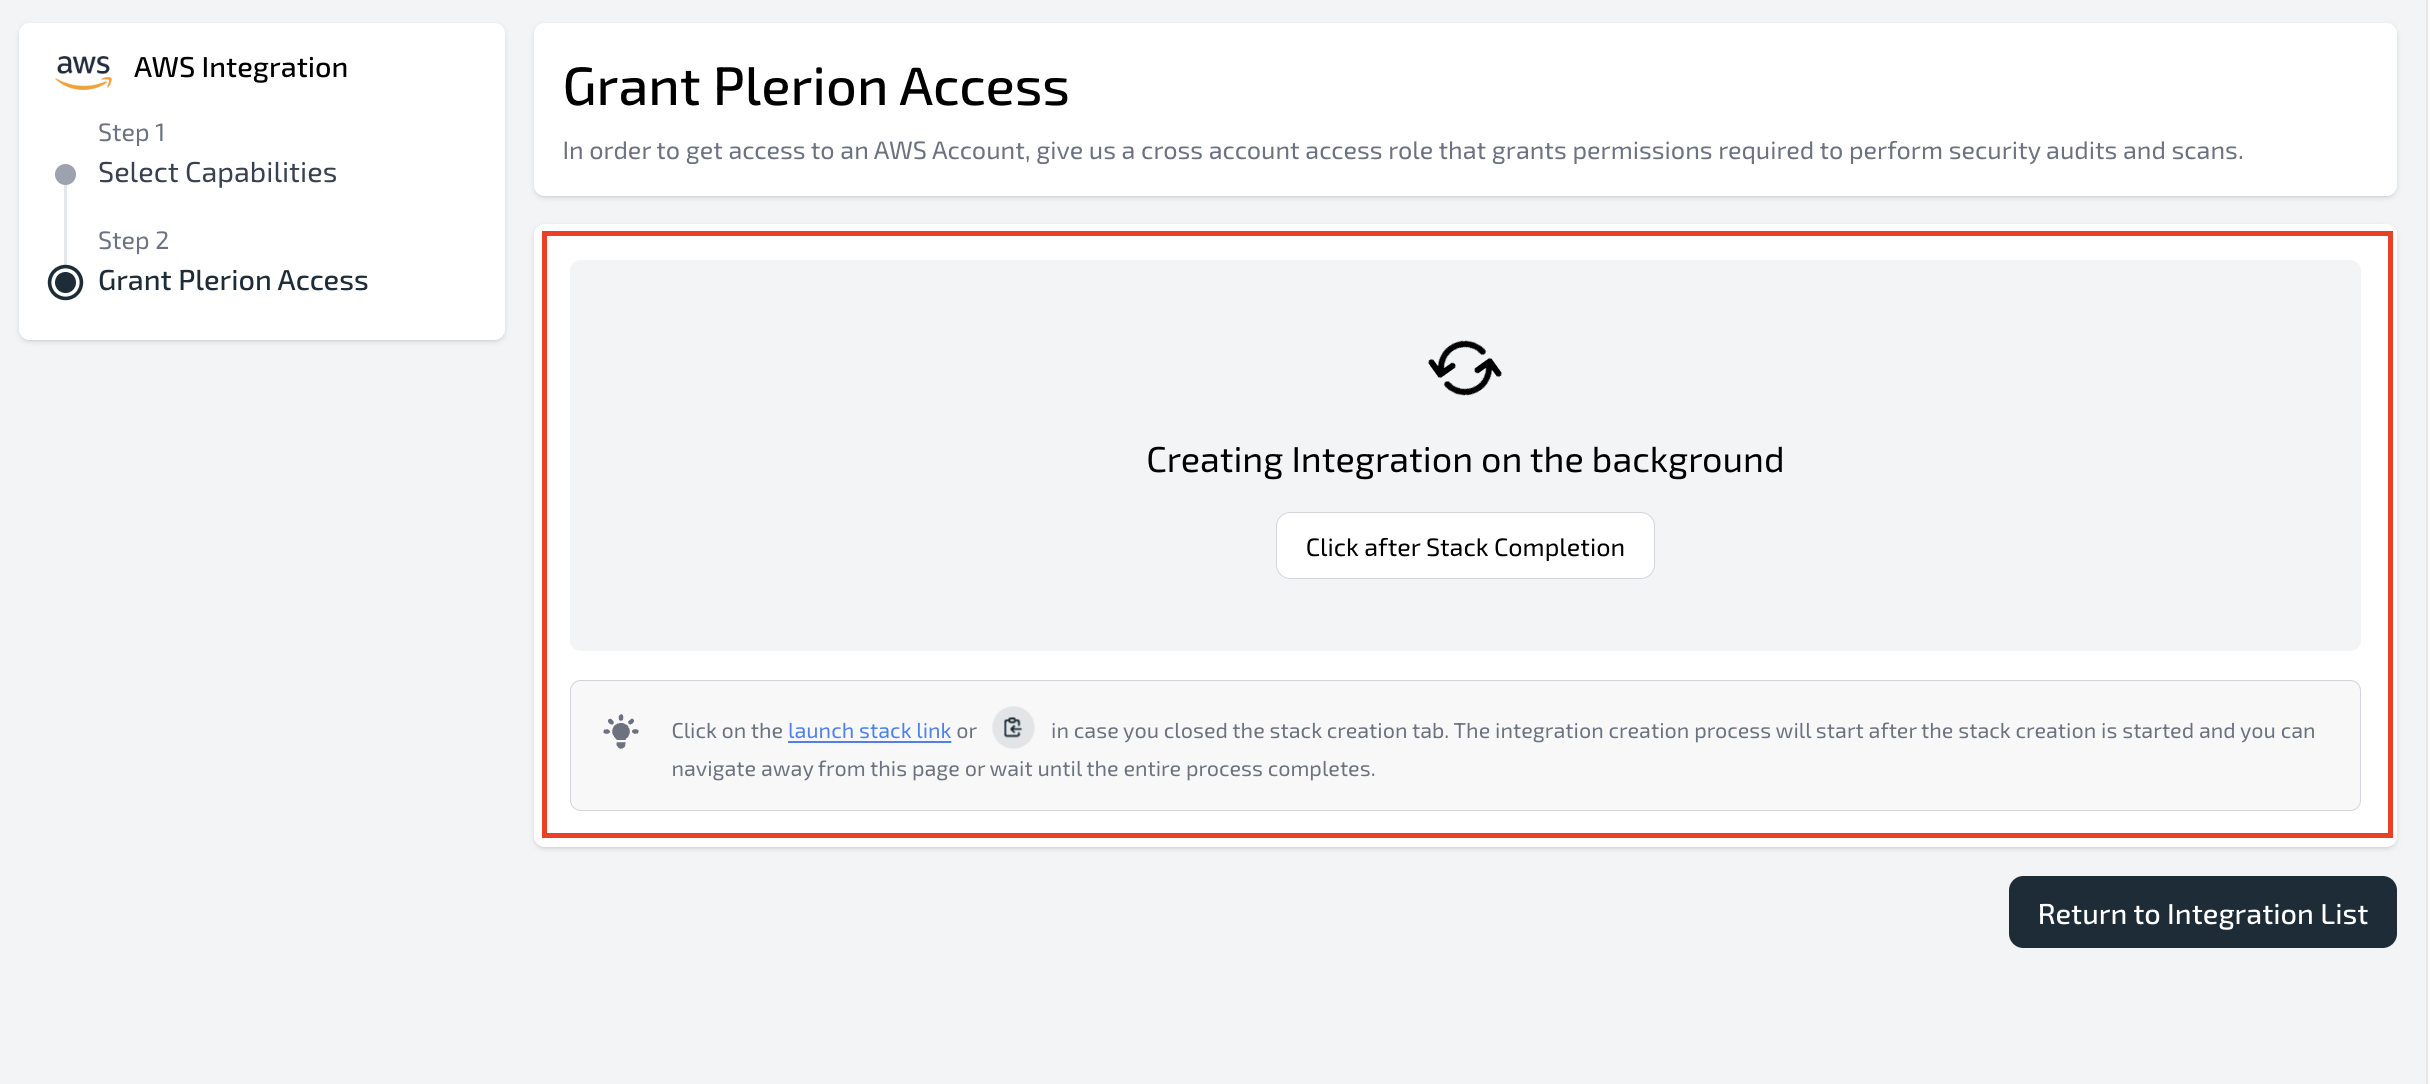
* Return to Plerion. While the stack is being created, you’ll see a loader screen.
* Once the stack completes, Plerion will automatically finalize the integration and trigger the first scan.
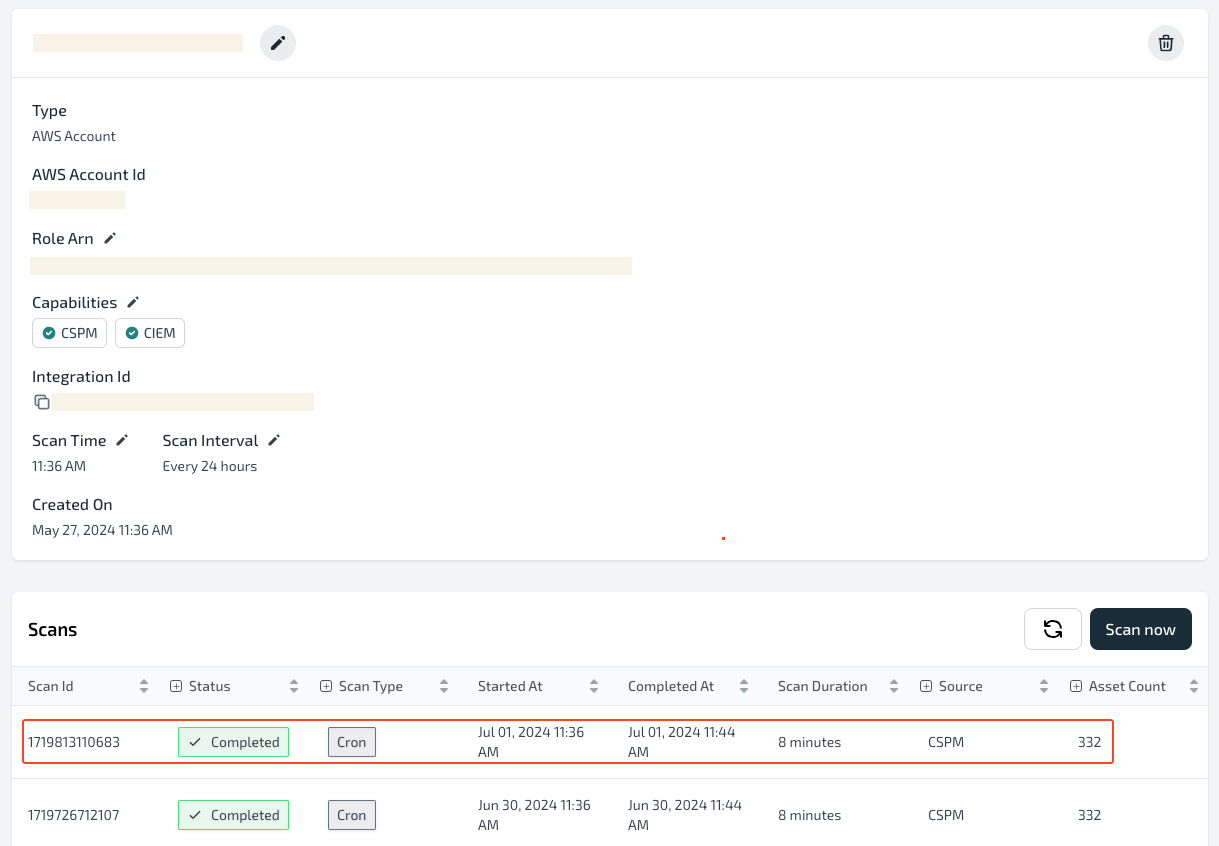
* The initial scan typically finishes in under 10 minutes for small accounts. You can track progress under `Settings` → `Integrations` → `Scans`, and view results in the **Compliance**, **Well-Architected**, and **Findings** dashboards.
You can grant Plerion access using either **Automated** *(recommended)* or **Manual** mode:
### Automated mode (recommended)
* Click `Launch stack` to open the **Quick create stack** page in AWS CloudFormation.
* Keep the default parameters and acknowledge required capabilities, then click `Create stack`.
* Return to Plerion. While the stack is being created, you’ll see a loader screen.
* Once the stack completes, Plerion will automatically finalize the integration and trigger the first scan.
* The initial scan typically finishes in under 10 minutes for small accounts. You can track progress under `Settings` → `Integrations` → `Scans`, and view results in the **Compliance**, **Well-Architected**, and **Findings** dashboards.
 ### Manual mode
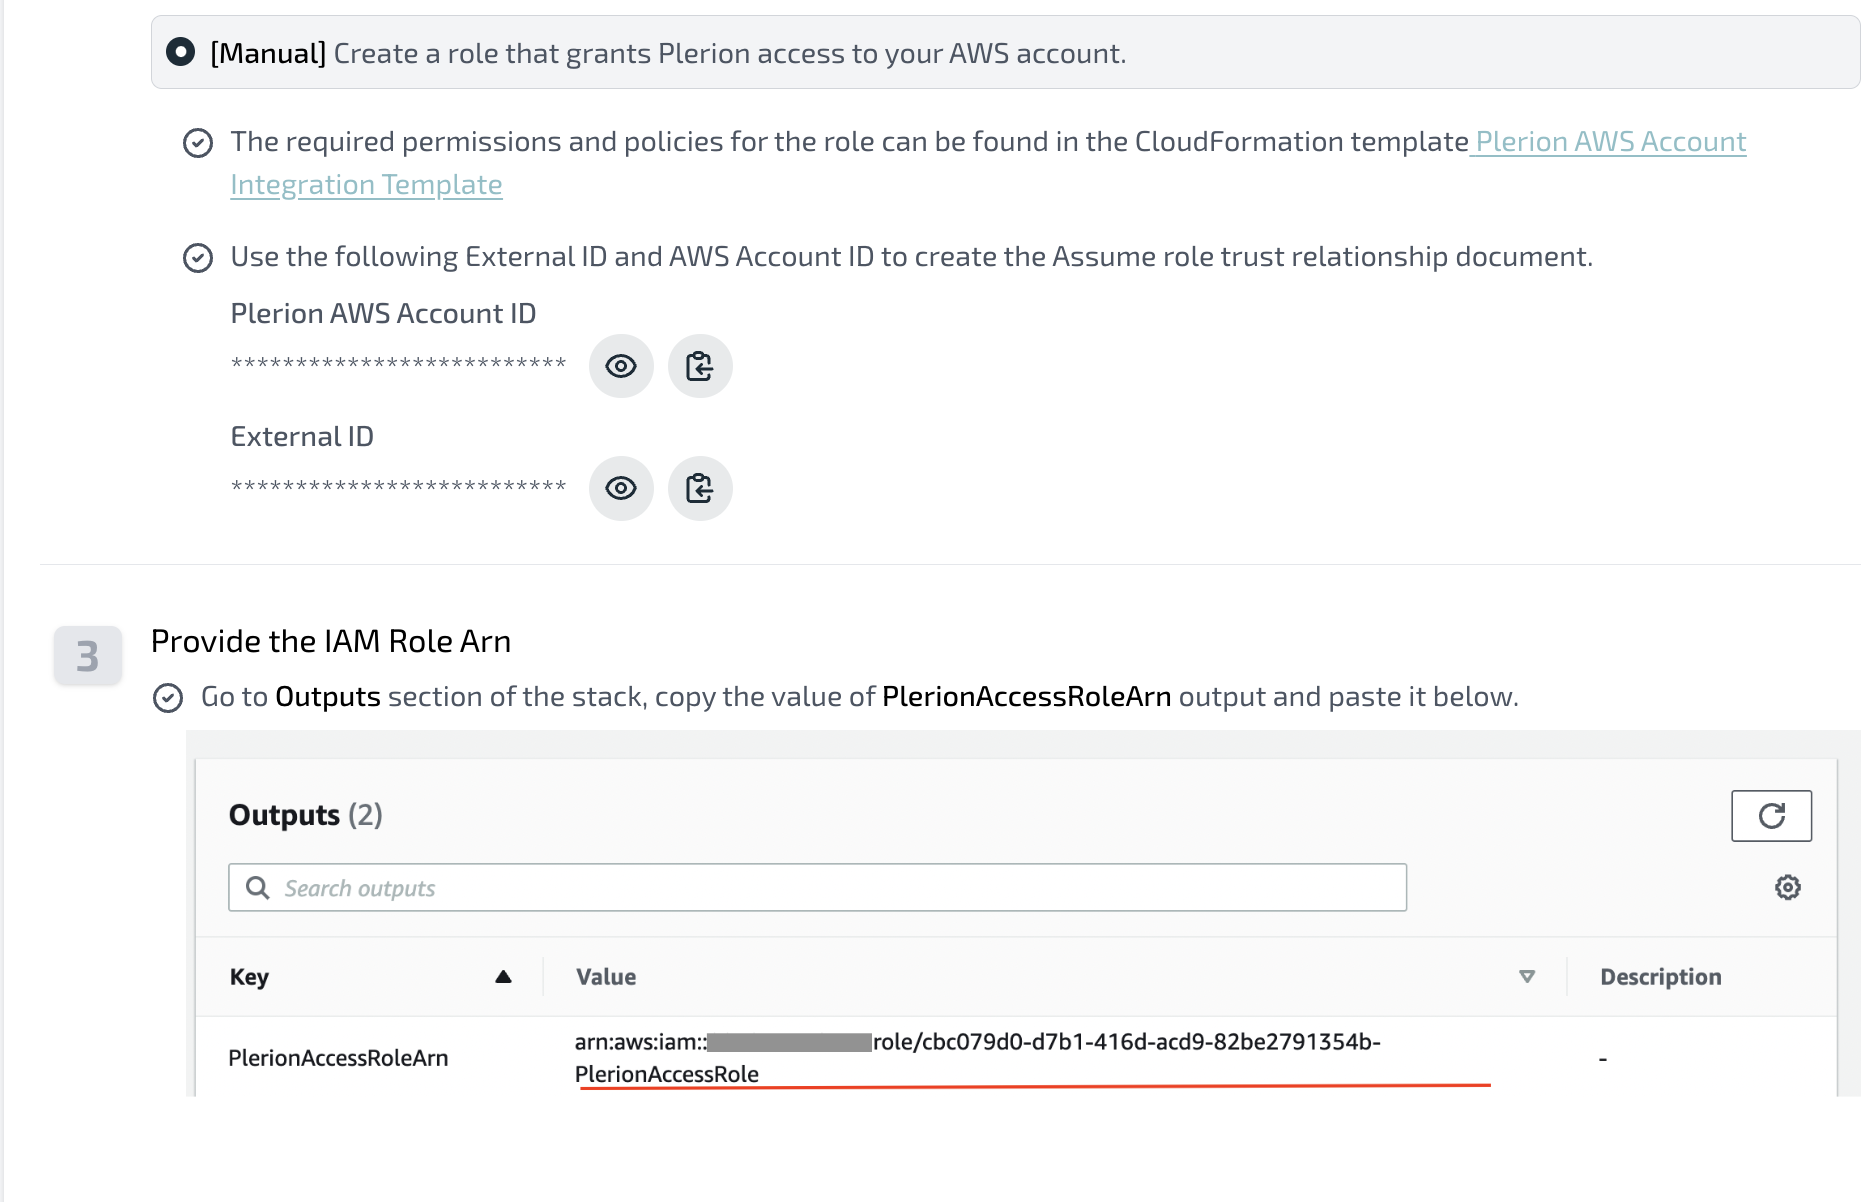
* Create an IAM role in your target AWS account that trusts Plerion.
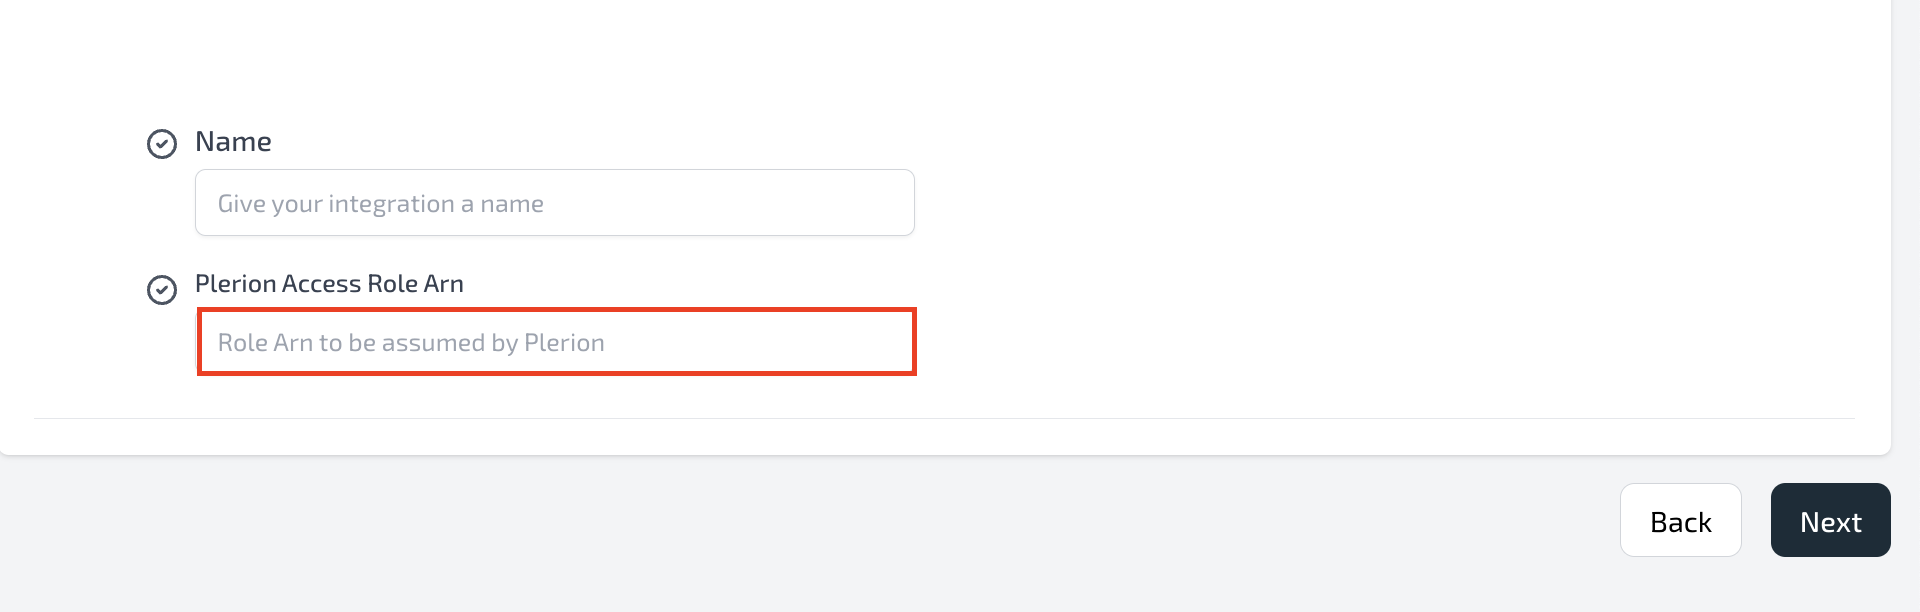
* Copy the **Role ARN** and paste it into the **Plerion access role ARN** field, then click `Next`.
* Plerion will verify permissions and start the initial **CSPM/CIEM** scan automatically.
* You can track progress under `Settings` > `Integrations` > `Scans`. When complete, you can view results in **Compliance**, **Well-Architected**, and **Findings**.
### Manual mode
* Create an IAM role in your target AWS account that trusts Plerion.
* Copy the **Role ARN** and paste it into the **Plerion access role ARN** field, then click `Next`.
* Plerion will verify permissions and start the initial **CSPM/CIEM** scan automatically.
* You can track progress under `Settings` > `Integrations` > `Scans`. When complete, you can view results in **Compliance**, **Well-Architected**, and **Findings**.
 ***
## Steps to enable CWPP for your AWS account (optional)
To enable CWPP during onboarding, choose one of the following deployment strategies:
* **Plerion-managed scanning** *(recommended)*: Plerion runs the scanning appliances in its own AWS accounts.
* You only grant a cross-account role. There is no VPC or networking to configure.
* See [Plerion-managed scanning](/guides/integrations/aws/managed-scanning/overview) for detailed steps.
* **Service account**: Launches Plerion appliances from a dedicated service account.
* Best option for ongoing customer-hosted workload protection at scale.
* See [AWS service account setup](/guides/integrations/aws/service-account/getting-started-with-aws-service-account) for detailed steps.
* **Same account**: Launches Plerion appliances directly in the AWS account being onboarded.
* Requires networking configuration (VPC, Subnet, and Security Groups) to allow appliance traffic.
* Use the provided CloudFormation template to simplify setup.
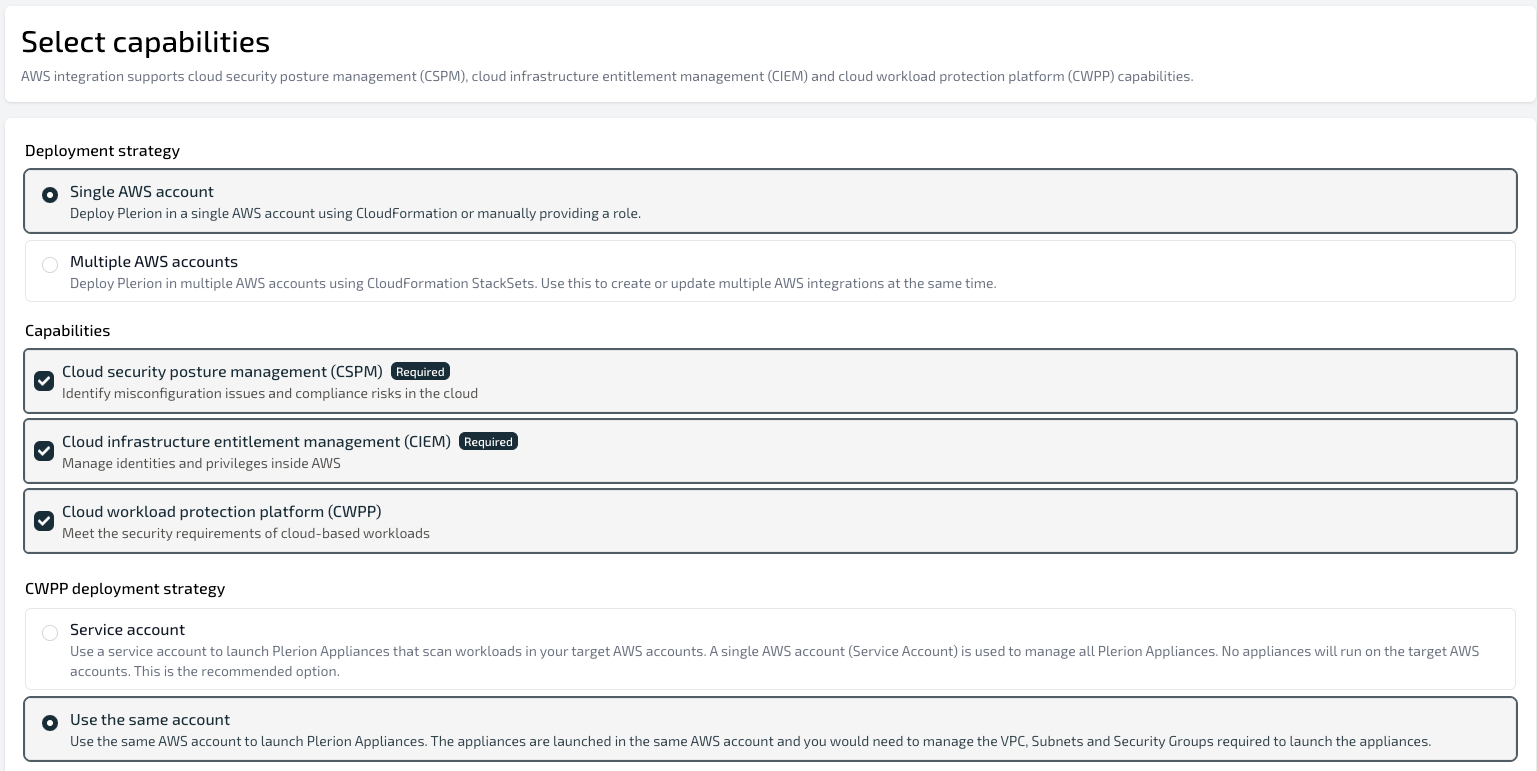
On the **Select capabilities** page, select **Cloud Workload Protection Platform (CWPP)** and click `Next`.
***
## Steps to enable CWPP for your AWS account (optional)
To enable CWPP during onboarding, choose one of the following deployment strategies:
* **Plerion-managed scanning** *(recommended)*: Plerion runs the scanning appliances in its own AWS accounts.
* You only grant a cross-account role. There is no VPC or networking to configure.
* See [Plerion-managed scanning](/guides/integrations/aws/managed-scanning/overview) for detailed steps.
* **Service account**: Launches Plerion appliances from a dedicated service account.
* Best option for ongoing customer-hosted workload protection at scale.
* See [AWS service account setup](/guides/integrations/aws/service-account/getting-started-with-aws-service-account) for detailed steps.
* **Same account**: Launches Plerion appliances directly in the AWS account being onboarded.
* Requires networking configuration (VPC, Subnet, and Security Groups) to allow appliance traffic.
* Use the provided CloudFormation template to simplify setup.
On the **Select capabilities** page, select **Cloud Workload Protection Platform (CWPP)** and click `Next`.
 Make sure you are signed in to the target AWS account. Choose either **Automated** (recommended) or **Manual** to create the IAM role that grants Plerion access.
* On the **Workload configuration** page, select which workloads to protect.
* Supported options are **Amazon Elastic Compute Cloud (EC2)**, **AWS Lambda**, **Amazon Elastic Container Service (ECS)**, **Amazon Elastic Container Registry (ECR)**, **Amazon Machine Images (AMI)**
* On the **Appliance configuration** page, regions containing the selected workloads are displayed. For each region:
* Provide networking details (VPC, Subnet, and Security Group) that allow outbound access to the internet.
* Use the `Validate` button to test connectivity.
Make sure you are signed in to the target AWS account. Choose either **Automated** (recommended) or **Manual** to create the IAM role that grants Plerion access.
* On the **Workload configuration** page, select which workloads to protect.
* Supported options are **Amazon Elastic Compute Cloud (EC2)**, **AWS Lambda**, **Amazon Elastic Container Service (ECS)**, **Amazon Elastic Container Registry (ECR)**, **Amazon Machine Images (AMI)**
* On the **Appliance configuration** page, regions containing the selected workloads are displayed. For each region:
* Provide networking details (VPC, Subnet, and Security Group) that allow outbound access to the internet.
* Use the `Validate` button to test connectivity.
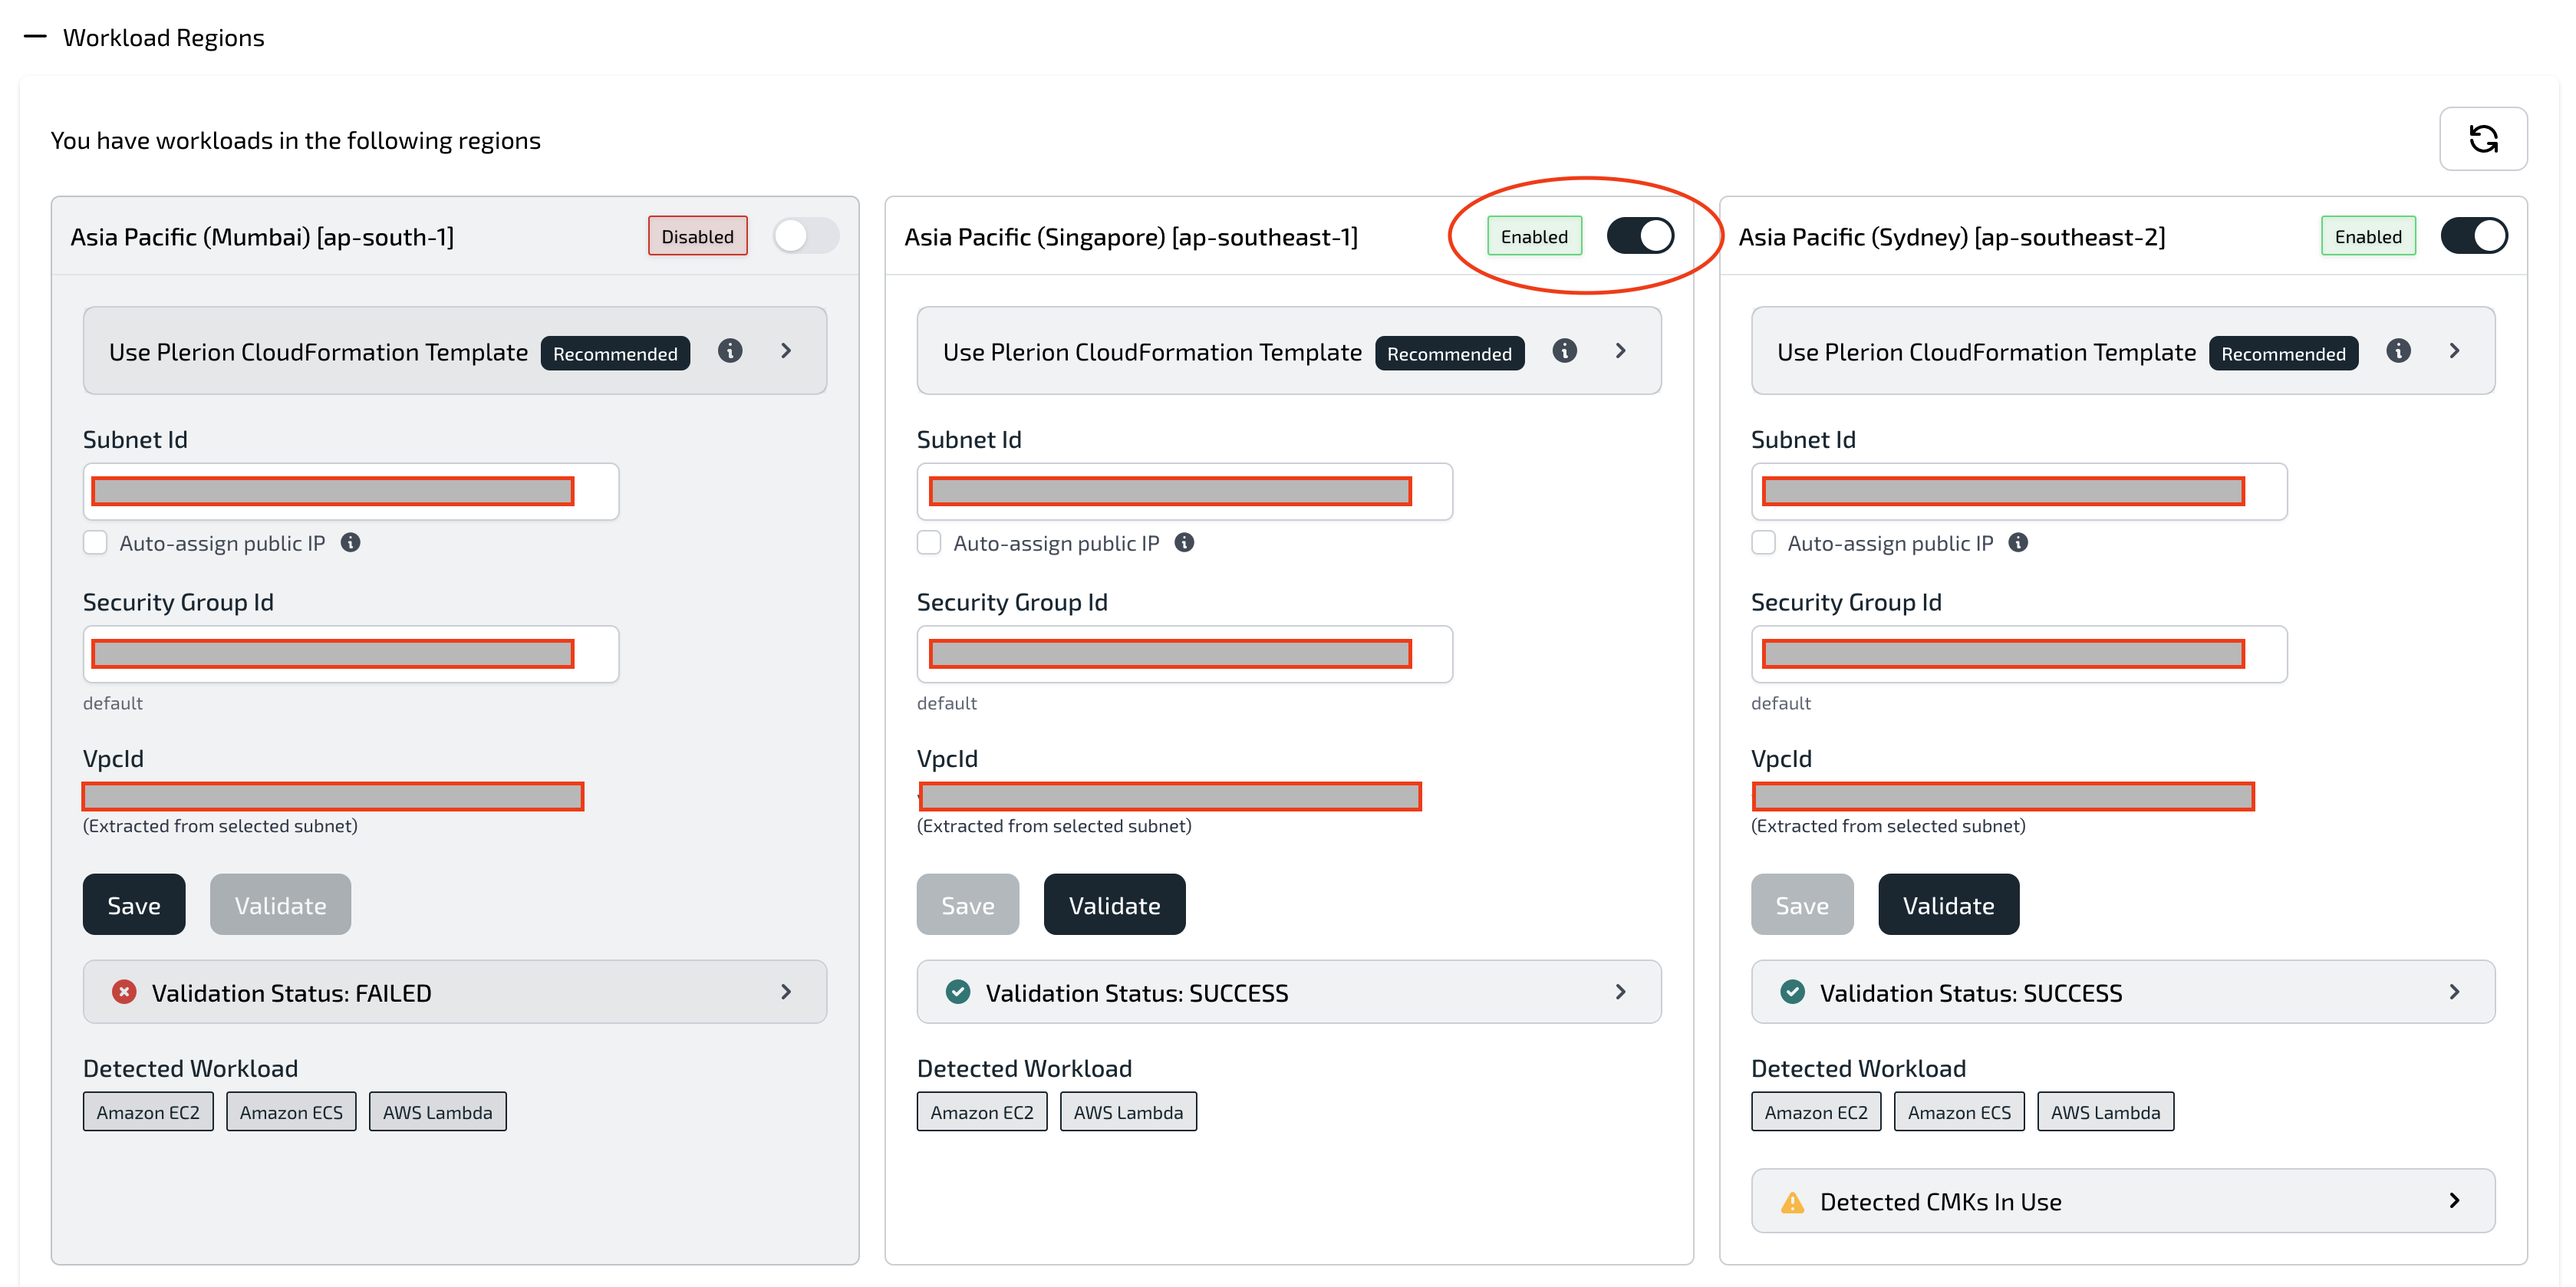
You can:
* **Use the example CloudFormation template** to create the required networking components (VPC, Subnet, Internet Gateway, Route Table, and Network ACL).
* **Delegate to Plerion**: Use a Plerion-managed template to automatically configure a single region. Multi-region delegation will be supported in a future update, but for now, use [StackSets](https://docs.aws.amazon.com/AWSCloudFormation/latest/UserGuide/stacksets-getting-started-create.html) for multi-region deployments.
In **Advanced settings**, you can enable additional AWS regions that don’t currently have workloads.
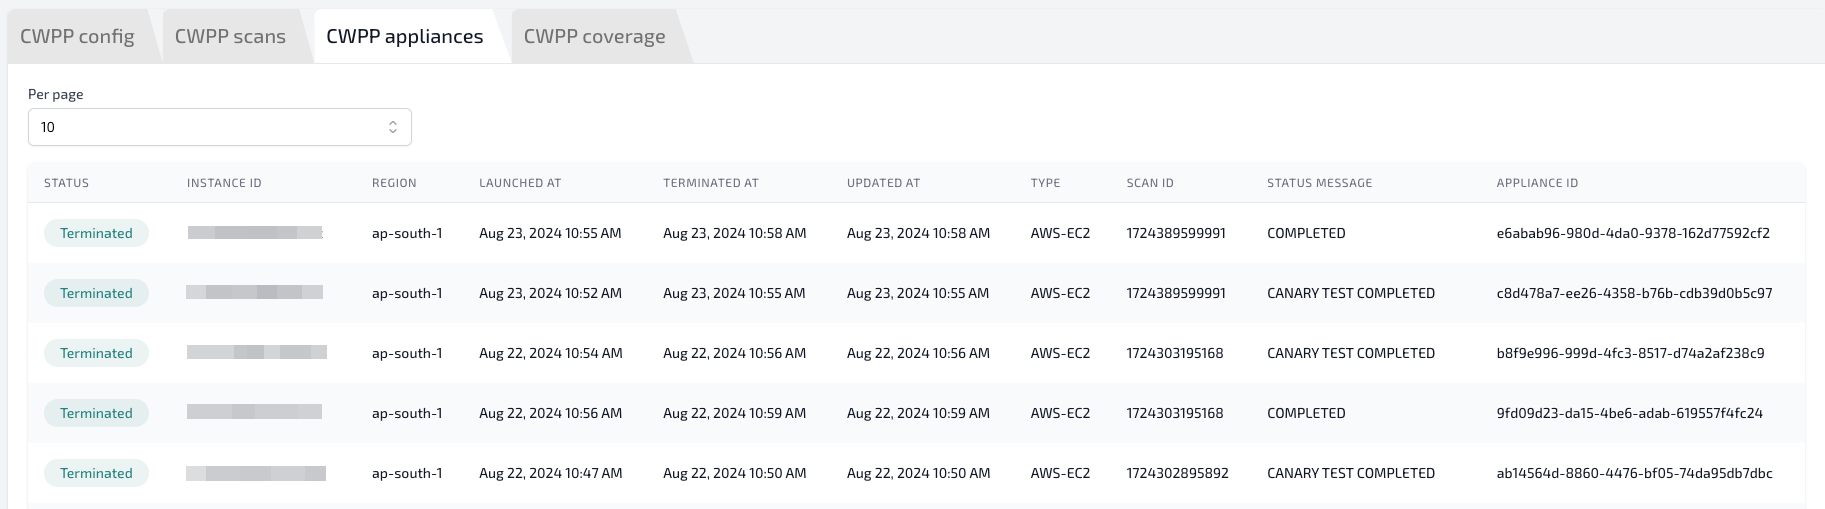
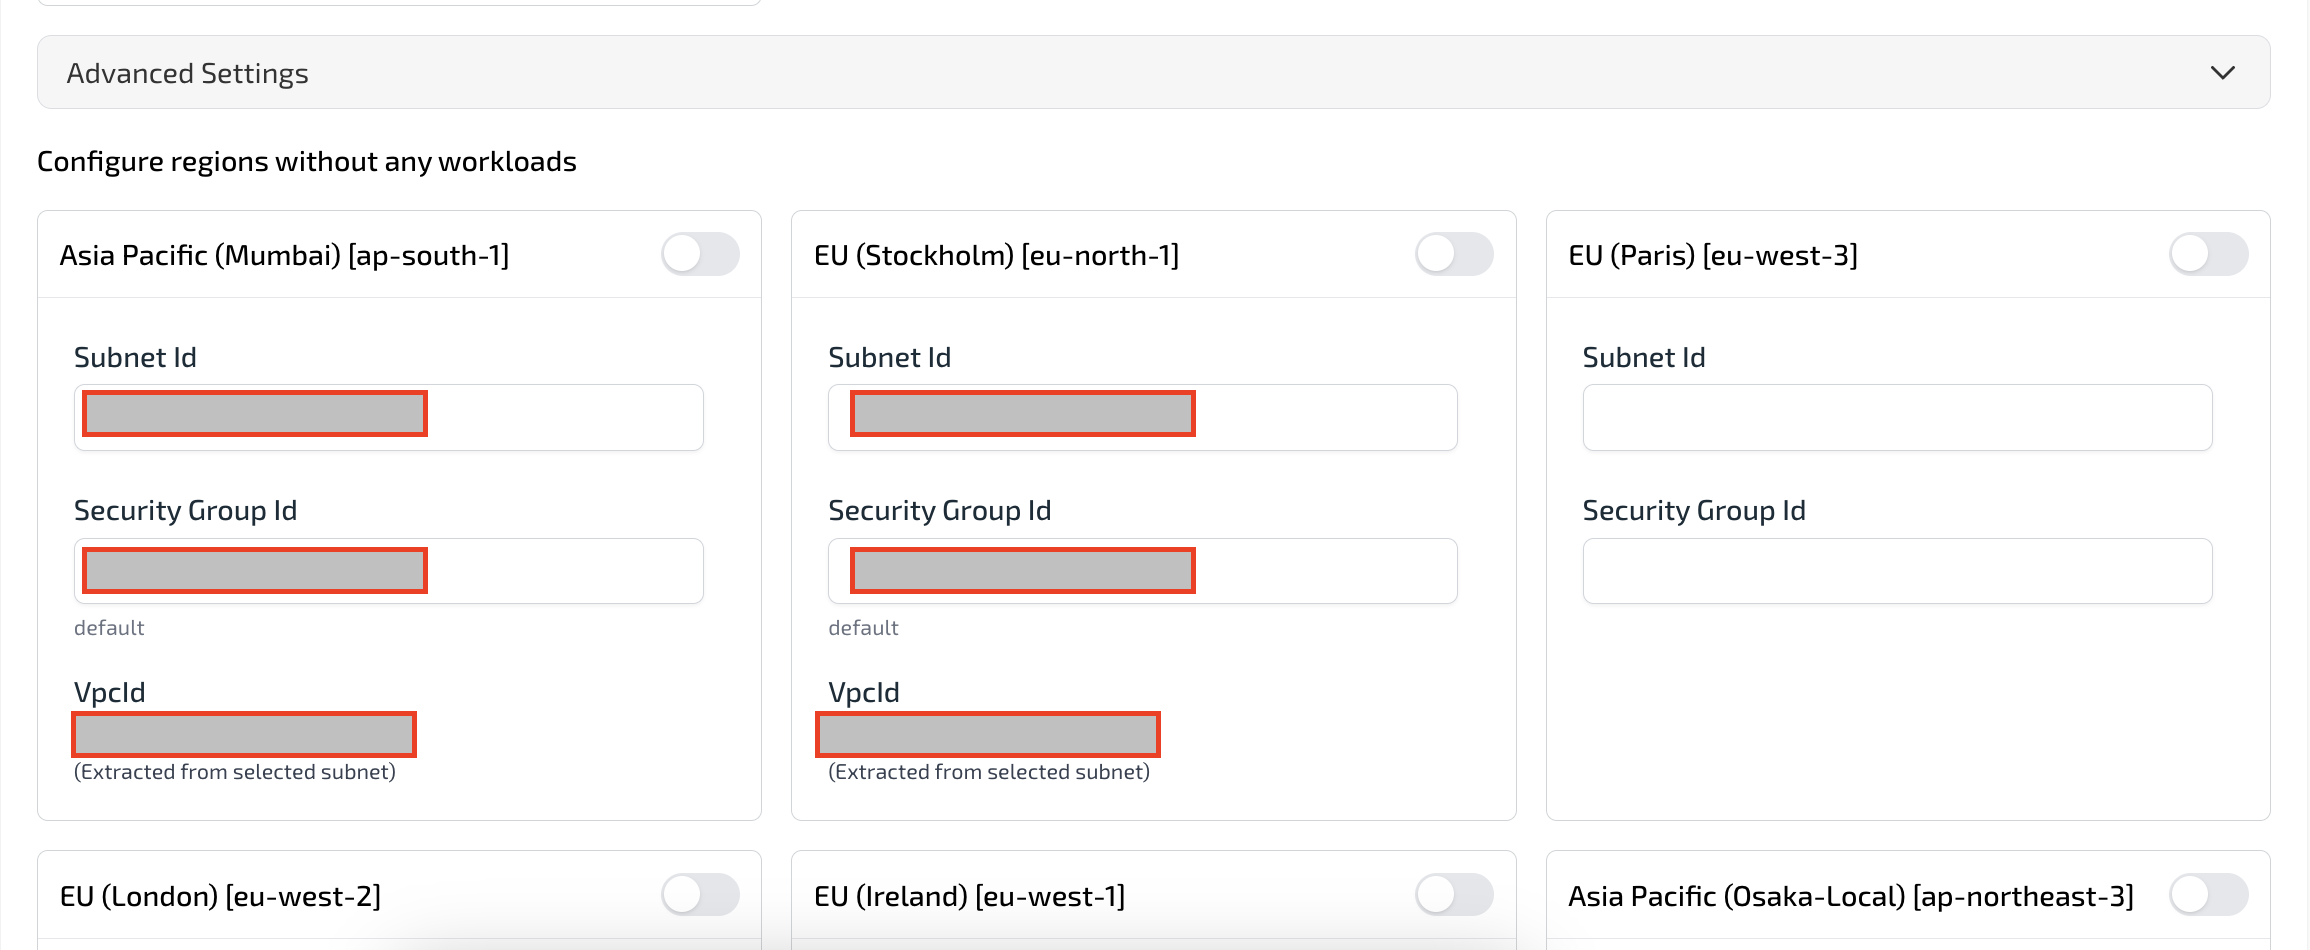 Each CWPP integration first triggers a CSPM scan, followed by a CWPP scan. For every CWPP scan:
* An appliance **EC2 instance** is launched in each enabled region.
* The appliance scans workloads and then terminates automatically.
You can view workload and appliance details on the **Integration information** page.
Each CWPP integration first triggers a CSPM scan, followed by a CWPP scan. For every CWPP scan:
* An appliance **EC2 instance** is launched in each enabled region.
* The appliance scans workloads and then terminates automatically.
You can view workload and appliance details on the **Integration information** page.

 ***
### Example CloudFormation template for network configuration
The following is an example CloudFormation template for network configuration. This template can be used to create a VPC, Subnet, Internet Gateway, Route Table, and Network ACL.
Users can create a Stack following [Creating a Stack](https://docs.aws.amazon.com/AWSCloudFormation/latest/UserGuide/cfn-console-create-stack.html) or deploy to multiple regions using [StackSets](https://docs.aws.amazon.com/AWSCloudFormation/latest/UserGuide/stacksets-getting-started-create.html).
Copy the following template and save it as a YAML file
```yaml filename="YAML" copy theme={"system"}
AWSTemplateFormatVersion: '2010-09-09'
Parameters:
CidrBlockParameter:
Type: String
Default: '192.168.0.0/24'
Description: 'CIDR block for Plerion Appliance VPC'
Resources:
PlerionApplianceVPC:
Type: AWS::EC2::VPC
Properties:
Tags:
- Key: Owner
Value: Plerion
- Key: Purpose
Value: PlerionCWPPAppliance
CidrBlock: !Ref CidrBlockParameter
EnableDnsSupport: true
EnableDnsHostnames: true
PlerionApplianceInternetGateway:
Type: 'AWS::EC2::InternetGateway'
Properties:
Tags:
- Key: Owner
Value: Plerion
- Key: Purpose
Value: PlerionCWPPAppliance
PlerionApplianceVPCGatewayAttachment:
Type: 'AWS::EC2::VPCGatewayAttachment'
Properties:
InternetGatewayId: !Ref PlerionApplianceInternetGateway
VpcId: !Ref PlerionApplianceVPC
PlerionAppliancePublicRouteTable:
Type: AWS::EC2::RouteTable
Properties:
Tags:
- Key: Owner
Value: Plerion
- Key: Purpose
Value: PlerionCWPPAppliance
VpcId: !Ref PlerionApplianceVPC
PlerionAppliancePublicRoute:
DependsOn: PlerionApplianceVPCGatewayAttachment
Type: AWS::EC2::Route
Properties:
RouteTableId: !Ref PlerionAppliancePublicRouteTable
DestinationCidrBlock: 0.0.0.0/0
GatewayId: !Ref PlerionApplianceInternetGateway
PlerionAppliancePublicSubnet01:
Type: AWS::EC2::Subnet
Properties:
Tags:
- Key: Owner
Value: Plerion
- Key: Purpose
Value: PlerionCWPPAppliance
MapPublicIpOnLaunch: true
CidrBlock: !Ref CidrBlockParameter
AvailabilityZone: !Select
- 0
- Fn::GetAZs: !Ref 'AWS::Region'
VpcId: !Ref PlerionApplianceVPC
PlerionAppliancePublicSubnet01RouteTableAssociation:
Type: AWS::EC2::SubnetRouteTableAssociation
Properties:
SubnetId: !Ref PlerionAppliancePublicSubnet01
RouteTableId: !Ref PlerionAppliancePublicRouteTable
PlerionApplianceNACL:
Type: AWS::EC2::NetworkAcl
Properties:
Tags:
- Key: Owner
Value: Plerion
- Key: Purpose
Value: PlerionCWPPAppliance
VpcId: !Ref PlerionApplianceVPC
PlerionApplianceNACLPublicSubnet01Association:
Type: AWS::EC2::SubnetNetworkAclAssociation
Properties:
NetworkAclId: !Ref PlerionApplianceNACL
SubnetId: !Ref PlerionAppliancePublicSubnet01
PlerionApplianceNACLOutbound:
Type: AWS::EC2::NetworkAclEntry
Properties:
NetworkAclId: !Ref PlerionApplianceNACL
RuleNumber: 100
Protocol: -1
Egress: true
RuleAction: allow
CidrBlock: 0.0.0.0/0
PlerionApplianceNACLInbound:
Type: AWS::EC2::NetworkAclEntry
Properties:
NetworkAclId: !Ref PlerionApplianceNACL
RuleNumber: 100
Protocol: -1
RuleAction: allow
CidrBlock: 0.0.0.0/0
PlerionApplianceSecurityGroup:
Type: AWS::EC2::SecurityGroup
Properties:
Tags:
- Key: Owner
Value: Plerion
- Key: Purpose
Value: PlerionCWPPAppliance
GroupDescription: Allow HTTPS egress
VpcId: !Ref PlerionApplianceVPC
SecurityGroupEgress:
- IpProtocol: tcp
FromPort: 443
ToPort: 443
CidrIp: 0.0.0.0/0
```
***
### Example CloudFormation template for network configuration
The following is an example CloudFormation template for network configuration. This template can be used to create a VPC, Subnet, Internet Gateway, Route Table, and Network ACL.
Users can create a Stack following [Creating a Stack](https://docs.aws.amazon.com/AWSCloudFormation/latest/UserGuide/cfn-console-create-stack.html) or deploy to multiple regions using [StackSets](https://docs.aws.amazon.com/AWSCloudFormation/latest/UserGuide/stacksets-getting-started-create.html).
Copy the following template and save it as a YAML file
```yaml filename="YAML" copy theme={"system"}
AWSTemplateFormatVersion: '2010-09-09'
Parameters:
CidrBlockParameter:
Type: String
Default: '192.168.0.0/24'
Description: 'CIDR block for Plerion Appliance VPC'
Resources:
PlerionApplianceVPC:
Type: AWS::EC2::VPC
Properties:
Tags:
- Key: Owner
Value: Plerion
- Key: Purpose
Value: PlerionCWPPAppliance
CidrBlock: !Ref CidrBlockParameter
EnableDnsSupport: true
EnableDnsHostnames: true
PlerionApplianceInternetGateway:
Type: 'AWS::EC2::InternetGateway'
Properties:
Tags:
- Key: Owner
Value: Plerion
- Key: Purpose
Value: PlerionCWPPAppliance
PlerionApplianceVPCGatewayAttachment:
Type: 'AWS::EC2::VPCGatewayAttachment'
Properties:
InternetGatewayId: !Ref PlerionApplianceInternetGateway
VpcId: !Ref PlerionApplianceVPC
PlerionAppliancePublicRouteTable:
Type: AWS::EC2::RouteTable
Properties:
Tags:
- Key: Owner
Value: Plerion
- Key: Purpose
Value: PlerionCWPPAppliance
VpcId: !Ref PlerionApplianceVPC
PlerionAppliancePublicRoute:
DependsOn: PlerionApplianceVPCGatewayAttachment
Type: AWS::EC2::Route
Properties:
RouteTableId: !Ref PlerionAppliancePublicRouteTable
DestinationCidrBlock: 0.0.0.0/0
GatewayId: !Ref PlerionApplianceInternetGateway
PlerionAppliancePublicSubnet01:
Type: AWS::EC2::Subnet
Properties:
Tags:
- Key: Owner
Value: Plerion
- Key: Purpose
Value: PlerionCWPPAppliance
MapPublicIpOnLaunch: true
CidrBlock: !Ref CidrBlockParameter
AvailabilityZone: !Select
- 0
- Fn::GetAZs: !Ref 'AWS::Region'
VpcId: !Ref PlerionApplianceVPC
PlerionAppliancePublicSubnet01RouteTableAssociation:
Type: AWS::EC2::SubnetRouteTableAssociation
Properties:
SubnetId: !Ref PlerionAppliancePublicSubnet01
RouteTableId: !Ref PlerionAppliancePublicRouteTable
PlerionApplianceNACL:
Type: AWS::EC2::NetworkAcl
Properties:
Tags:
- Key: Owner
Value: Plerion
- Key: Purpose
Value: PlerionCWPPAppliance
VpcId: !Ref PlerionApplianceVPC
PlerionApplianceNACLPublicSubnet01Association:
Type: AWS::EC2::SubnetNetworkAclAssociation
Properties:
NetworkAclId: !Ref PlerionApplianceNACL
SubnetId: !Ref PlerionAppliancePublicSubnet01
PlerionApplianceNACLOutbound:
Type: AWS::EC2::NetworkAclEntry
Properties:
NetworkAclId: !Ref PlerionApplianceNACL
RuleNumber: 100
Protocol: -1
Egress: true
RuleAction: allow
CidrBlock: 0.0.0.0/0
PlerionApplianceNACLInbound:
Type: AWS::EC2::NetworkAclEntry
Properties:
NetworkAclId: !Ref PlerionApplianceNACL
RuleNumber: 100
Protocol: -1
RuleAction: allow
CidrBlock: 0.0.0.0/0
PlerionApplianceSecurityGroup:
Type: AWS::EC2::SecurityGroup
Properties:
Tags:
- Key: Owner
Value: Plerion
- Key: Purpose
Value: PlerionCWPPAppliance
GroupDescription: Allow HTTPS egress
VpcId: !Ref PlerionApplianceVPC
SecurityGroupEgress:
- IpProtocol: tcp
FromPort: 443
ToPort: 443
CidrIp: 0.0.0.0/0
```